
In Box Review of Trimaster 1/48th Scale
Heinkel He-162A-2 Volksjager
With BMW 003E Engine & Alternate V Tail
Kit no. MAB-103-3800
By Ray Mehlberger
OUT OF PRODUCTION
By Ray Mehlberger
OUT OF PRODUCTION
HISTORY:
The He-162A-2 “Volksjager”, usually called by its development project code name “Salemander”, was a German air defence fighter developed under “People’s Fighter” plan conceived in March 1944. The prototype made it’s maiden flight on December 6, 1944, only three months after the actual specification was issued. Carrying a BMW-OO3A turbojet engine on the back, and a pair of MK 108 30 mm cannons in the nose, the He-162 achieved a maximum speed of nearly 840 km/h The main production model A2 made its first flight on January 24, 1945.
The A2 was powered by the BMW-003E-1 engine and armed with the MG 151 20 mm guns in place of the MK-108 cannons. It is said that a total of 112 aircraft were built and delivery was made to JG-1 near the end of the war, but it was too late to see any remarkable results.
SPEC DATA:
Crew: 1
Wingspan: 7.20 m
Length: 9.18 m
Height: 2.65 m
Fully equipped weight: 2,805 kg
Powerplant: One BMW-003E-1 (max thrust 920 kg)
Max speed: 838 km/h at altitude of 6,000 m
Max ceiling: 12,000 m
Range: 620 km
Fixed armament: 2 x MG-151 20 mm guns
Tristar was a model company based in Japan that went out of business. Their molds later appeared under the DML label mostly and a few under Italeri.
THE KIT:
This kit came in a shrink wrapped tray and lid type box.
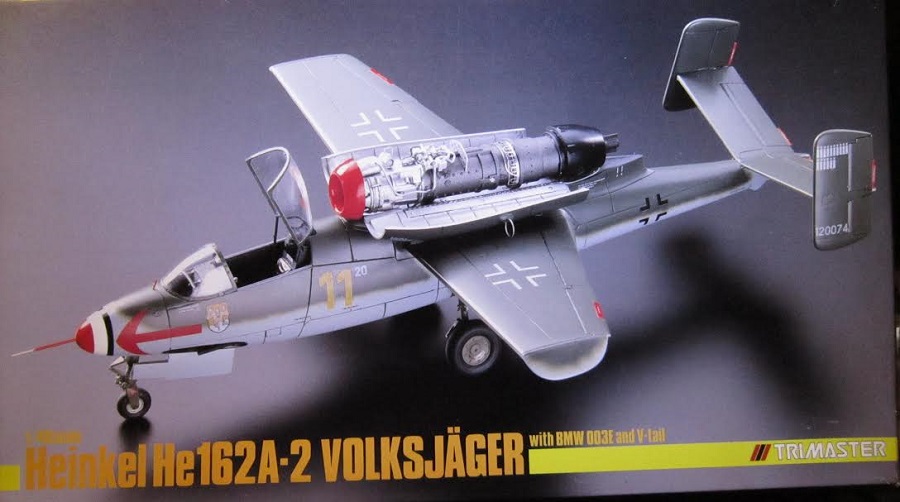
The box art shows a color photo of the model made up. It is in a camouflage scheme of RLM-71 dark green over RLM-65 light blue. It’s nose has red, white and black bands followed by a red arrow and a unit logo of a shield with a devil looking over a cloud on it and a large yellow 11 with a small white 20 to the right of it just in front of the wings on the sides. The tops of the wings have white skeletal Germn crosses on them and the fuselage sides have black skeletal ones. The rudder has 15 white victory marks on it and the white werk no. 120074.
This aircraft was flown by Oberleutnant Emil Demuth of 3/JG-1. It is my understanding from what I read in one of my books that the kill marks were transferred over from another type of aircraft Demuth flew earlier.
The cockpit canopy is hinged open and a dark cockpit is visible. The panels on the piggy-backed engine are open also to view the BMW engine. The nose of this ram jet is bright red and the tail cone is jet black. Black swastikas on the rudder.
The swastika has been sanitized off the box art and deleted. This is to make the kit polically correct for sale in Germany or any other country where the swastika is a NO-NO.
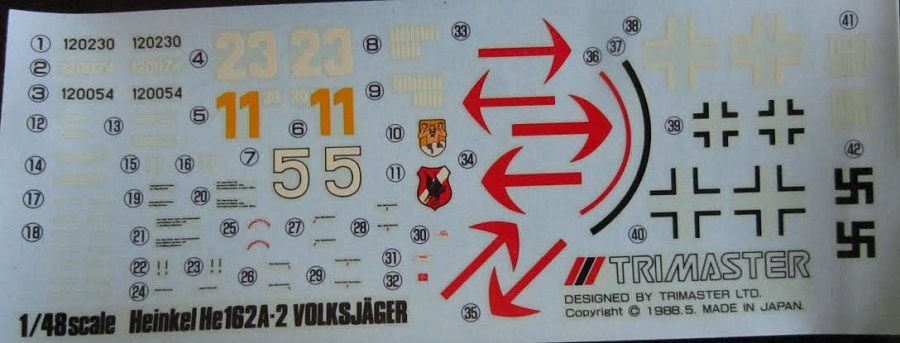
On the paint scheme instructions the area where the swastika goes is just illustrated as an empty square. However, the swastikas ARE on the decal sheet in the kit.
One side panel of the box has 4 color walk-around photos of the model made up in the box art scheme. One photo shows the standing pilot figure that is included in the kit.
These photos are followed by Trimaster’s street address in Shizuoka, Japan, the copyright of the kit of 1988 and MADE IN JAPAN.
The other side has illustrations of the decal sheet, wires and white metal parts in the kit, followed by a list of features of the kit:
"Contains parts made of white metal, photo etched stainless steel, metal wire and tubes and plastic injection molded parts. Glue and paint are not included. Kit includes the parts for the BMW-003E turbojet and optional V-tail."
The He-162A-2 “Volksjager”, usually called by its development project code name “Salemander”, was a German air defence fighter developed under “People’s Fighter” plan conceived in March 1944. The prototype made it’s maiden flight on December 6, 1944, only three months after the actual specification was issued. Carrying a BMW-OO3A turbojet engine on the back, and a pair of MK 108 30 mm cannons in the nose, the He-162 achieved a maximum speed of nearly 840 km/h The main production model A2 made its first flight on January 24, 1945.
The A2 was powered by the BMW-003E-1 engine and armed with the MG 151 20 mm guns in place of the MK-108 cannons. It is said that a total of 112 aircraft were built and delivery was made to JG-1 near the end of the war, but it was too late to see any remarkable results.
SPEC DATA:
Crew: 1
Wingspan: 7.20 m
Length: 9.18 m
Height: 2.65 m
Fully equipped weight: 2,805 kg
Powerplant: One BMW-003E-1 (max thrust 920 kg)
Max speed: 838 km/h at altitude of 6,000 m
Max ceiling: 12,000 m
Range: 620 km
Fixed armament: 2 x MG-151 20 mm guns
Tristar was a model company based in Japan that went out of business. Their molds later appeared under the DML label mostly and a few under Italeri.
THE KIT:
This kit came in a shrink wrapped tray and lid type box.
The box art shows a color photo of the model made up. It is in a camouflage scheme of RLM-71 dark green over RLM-65 light blue. It’s nose has red, white and black bands followed by a red arrow and a unit logo of a shield with a devil looking over a cloud on it and a large yellow 11 with a small white 20 to the right of it just in front of the wings on the sides. The tops of the wings have white skeletal Germn crosses on them and the fuselage sides have black skeletal ones. The rudder has 15 white victory marks on it and the white werk no. 120074.
This aircraft was flown by Oberleutnant Emil Demuth of 3/JG-1. It is my understanding from what I read in one of my books that the kill marks were transferred over from another type of aircraft Demuth flew earlier.
The cockpit canopy is hinged open and a dark cockpit is visible. The panels on the piggy-backed engine are open also to view the BMW engine. The nose of this ram jet is bright red and the tail cone is jet black. Black swastikas on the rudder.
The swastika has been sanitized off the box art and deleted. This is to make the kit polically correct for sale in Germany or any other country where the swastika is a NO-NO.
On the paint scheme instructions the area where the swastika goes is just illustrated as an empty square. However, the swastikas ARE on the decal sheet in the kit.
One side panel of the box has 4 color walk-around photos of the model made up in the box art scheme. One photo shows the standing pilot figure that is included in the kit.
These photos are followed by Trimaster’s street address in Shizuoka, Japan, the copyright of the kit of 1988 and MADE IN JAPAN.
The other side has illustrations of the decal sheet, wires and white metal parts in the kit, followed by a list of features of the kit:
"Contains parts made of white metal, photo etched stainless steel, metal wire and tubes and plastic injection molded parts. Glue and paint are not included. Kit includes the parts for the BMW-003E turbojet and optional V-tail."
WHAT’S IN THE KIT:
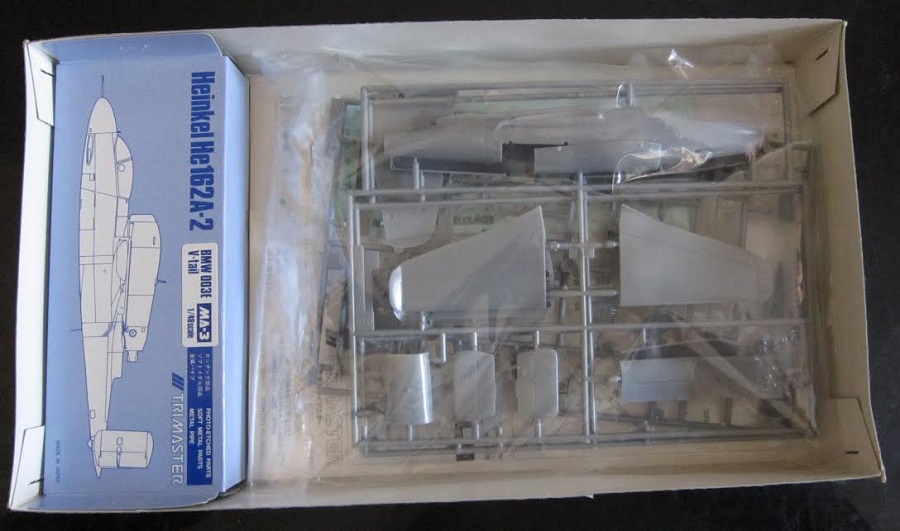
This kit contains 3 grey parts trees in a stapled-shut cello bag, a clear parts tree and the decal in another stapled-shut cello, 4 stainless steel PE frets each in a stapled-shut cello with cardboard backings to prevent bending of them in transit, 18 white metal parts in 3 stapled-shut cellos, 6 steel wires and 2 steel rods in 2 stapled-shut cellos.
The instructions complete the kit’s contents.
The instructions consist of a sheet that accordion-folds out into 8 pages and a single sheet printed on both sides that brings the page total to 10 in 7 ½” x 10 ½” page format.
Page 1 of the instructions begins with a black and white photo of the box art subject, followed by the history of the He-162A-2 in 6 languages, including English.
None of the assembly drawings are numbered. I count close to 40 maybe??
Page 2 begins with the first assembly steps to paint the pilot figure and assemble the dashboard and paint it. This is followed by CAUTIONS about the kit, international assembly symbol explanations and a listing of no less than 20 paint colors suggested to use to complete the model, in the 6 languages. No hobby paint brands are mentioned however.
The un-numbered assembly steps are spread over pages 3 to 5.
Page 6 has left and right profiles for 3 different marking and painting schemes.
1. A He-162A-2 flown by Oberst Herbert Lhlefeld with JG -1,. It is a camouflage of RLM 71 dark green over the fuselage spine and the turbojet nacelle as RLM 81 brown violet. The top of the right wing is also RLM 81. The nose of the aircraft has black and white bands followed by a red arrow.
The white number 23 is on the fuselage sides just in front of the wings. It has black skeletal German crosses on the fuselage sides and a black werk no. 120230 low on the rudder sides and white skeletal crosses above the wings and black skeletal crosses below them.
A black swastika goes on the rudder sides. The center section of the tail on top is red. The engine nose is chrome and the exhaust nozzle is too. The tail cone of the engine nacelle is black.
2. A He-162A-2 that is the box art subject. (already described above) It gets an all-white swastika for it’s rudder sides.
3.A He-162A-2 Flown by Hauptmann Helmut Kunnecke of 1/JG-1. It is in the same camouflage as Lhlefed’s aircraft. It has a red arrow on the sides of the nose also followed by a unit logo of a shield that is red with a white diagonal stripe across it and a black eagle in the center.
The white number 5 outlined in black is on the fuselage sides just in front of the wing. A black skeletal cross is on the fuselage sides . A black swastika is to go on the rudder. The black werk no. 120054 is low on the rudder sides also. The right half of the center of the tail top is red. The tail cone of the engine nacelle is black and so is the exhaust nozzle,. The nose of the nacelle is chrome.
Page 7 has illustrations of the tops of the 3 schemes and a common illustration of the undersides that all share the same.
At the bottom of the page is an illustration of another decal sheet that Trimaster marketed for the He-162A-1, set no. 48-2001. It is not overstating the fact that this kit shows many, many markings and is really loaded.
Page 8 of the instructions has the parts trees illustrations. However, not all the PE frets or the white metal parts are illustrated here.
These illustrations are above the decal application instructions at the bottom of the page and a mail-in coupon to order any missing parts for the kit, but in Japanese only.
Trimaster’s street address in Shizuoka, Japan is given again, along with the copyright date for the kit of 1988 and PRINTED IN JAPAN.
The single sheet of instructions has 7 assembly drawings on one side and engine wiring instructions and alternate v-tail assembly instructions on the other side.
Below them is a repeat of illustrations of parts trees A & C, two more illustrations of two of the stainless steel PE frets, and 8 more illustrations of white metal parts.
The mail-in coupon for service for the kit and Trimaster’s address etc. appears again.
It is strange that Trimaster split up the parts trees illustrations like this between two pages. Three parts on the C parts tree are shaded out blue on the illustrations as being excess and not needed to complete the kit.
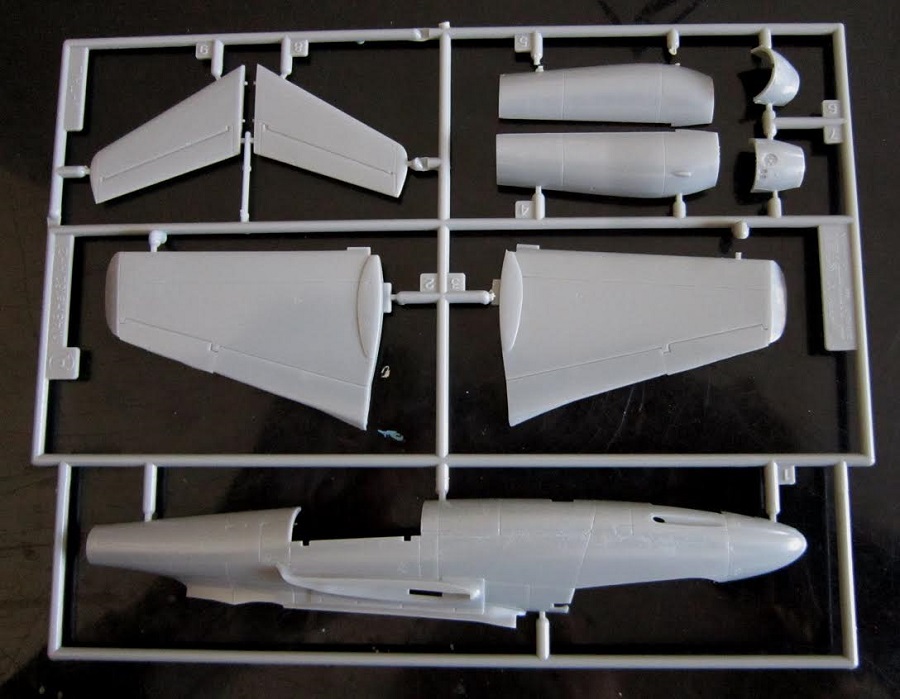
Grey letter A parts tree holds: the bottom wing halves, one fuselage half, the engine nacelle halves and cowling halves (7 parts)
This kit contains 3 grey parts trees in a stapled-shut cello bag, a clear parts tree and the decal in another stapled-shut cello, 4 stainless steel PE frets each in a stapled-shut cello with cardboard backings to prevent bending of them in transit, 18 white metal parts in 3 stapled-shut cellos, 6 steel wires and 2 steel rods in 2 stapled-shut cellos.
The instructions complete the kit’s contents.
The instructions consist of a sheet that accordion-folds out into 8 pages and a single sheet printed on both sides that brings the page total to 10 in 7 ½” x 10 ½” page format.
Page 1 of the instructions begins with a black and white photo of the box art subject, followed by the history of the He-162A-2 in 6 languages, including English.
None of the assembly drawings are numbered. I count close to 40 maybe??
Page 2 begins with the first assembly steps to paint the pilot figure and assemble the dashboard and paint it. This is followed by CAUTIONS about the kit, international assembly symbol explanations and a listing of no less than 20 paint colors suggested to use to complete the model, in the 6 languages. No hobby paint brands are mentioned however.
The un-numbered assembly steps are spread over pages 3 to 5.
Page 6 has left and right profiles for 3 different marking and painting schemes.
1. A He-162A-2 flown by Oberst Herbert Lhlefeld with JG -1,. It is a camouflage of RLM 71 dark green over the fuselage spine and the turbojet nacelle as RLM 81 brown violet. The top of the right wing is also RLM 81. The nose of the aircraft has black and white bands followed by a red arrow.
The white number 23 is on the fuselage sides just in front of the wings. It has black skeletal German crosses on the fuselage sides and a black werk no. 120230 low on the rudder sides and white skeletal crosses above the wings and black skeletal crosses below them.
A black swastika goes on the rudder sides. The center section of the tail on top is red. The engine nose is chrome and the exhaust nozzle is too. The tail cone of the engine nacelle is black.
2. A He-162A-2 that is the box art subject. (already described above) It gets an all-white swastika for it’s rudder sides.
3.A He-162A-2 Flown by Hauptmann Helmut Kunnecke of 1/JG-1. It is in the same camouflage as Lhlefed’s aircraft. It has a red arrow on the sides of the nose also followed by a unit logo of a shield that is red with a white diagonal stripe across it and a black eagle in the center.
The white number 5 outlined in black is on the fuselage sides just in front of the wing. A black skeletal cross is on the fuselage sides . A black swastika is to go on the rudder. The black werk no. 120054 is low on the rudder sides also. The right half of the center of the tail top is red. The tail cone of the engine nacelle is black and so is the exhaust nozzle,. The nose of the nacelle is chrome.
Page 7 has illustrations of the tops of the 3 schemes and a common illustration of the undersides that all share the same.
At the bottom of the page is an illustration of another decal sheet that Trimaster marketed for the He-162A-1, set no. 48-2001. It is not overstating the fact that this kit shows many, many markings and is really loaded.
Page 8 of the instructions has the parts trees illustrations. However, not all the PE frets or the white metal parts are illustrated here.
These illustrations are above the decal application instructions at the bottom of the page and a mail-in coupon to order any missing parts for the kit, but in Japanese only.
Trimaster’s street address in Shizuoka, Japan is given again, along with the copyright date for the kit of 1988 and PRINTED IN JAPAN.
The single sheet of instructions has 7 assembly drawings on one side and engine wiring instructions and alternate v-tail assembly instructions on the other side.
Below them is a repeat of illustrations of parts trees A & C, two more illustrations of two of the stainless steel PE frets, and 8 more illustrations of white metal parts.
The mail-in coupon for service for the kit and Trimaster’s address etc. appears again.
It is strange that Trimaster split up the parts trees illustrations like this between two pages. Three parts on the C parts tree are shaded out blue on the illustrations as being excess and not needed to complete the kit.
Grey letter A parts tree holds: the bottom wing halves, one fuselage half, the engine nacelle halves and cowling halves (7 parts)
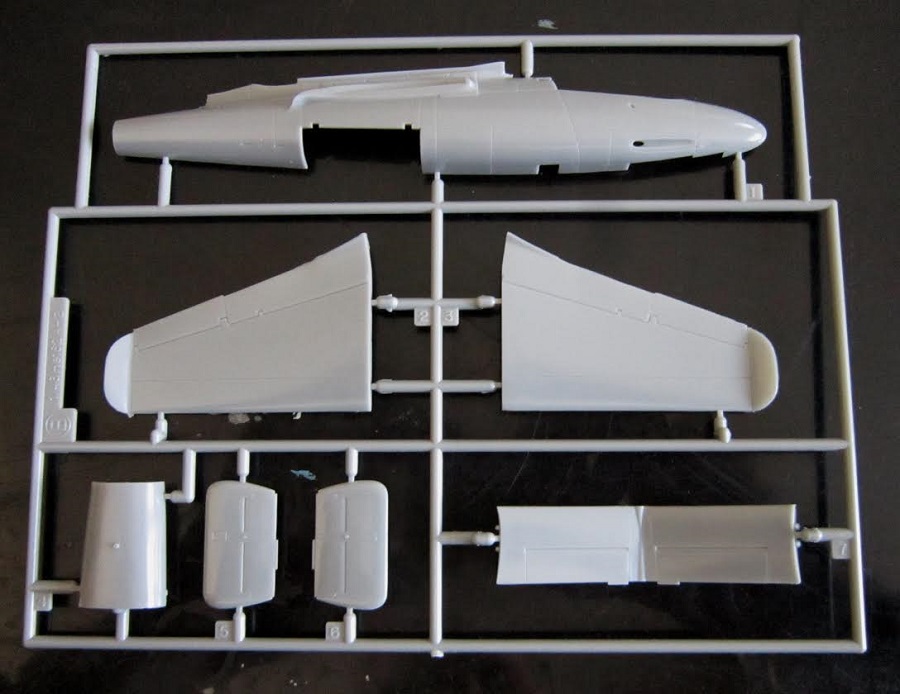
Grey letter B parts tree holds: the top wing halves, the other fuselage half and the horizontal stabilizer and twin rudders and top section of the rear fuselage (7 parts) This tail assembly with twin rudders is one of the two options in the kit, the other option being the V-tail.
Only the twin-rudders are shown in the 3 schemes shown for marking and painting. None features the V-type tail…..very strange that one of them isn’t a V-tail one shown.
Only the twin-rudders are shown in the 3 schemes shown for marking and painting. None features the V-type tail…..very strange that one of them isn’t a V-tail one shown.
Grey letter C parts tree holds: the engine halves, main wheels, nose wheel, standing pilot figure, enging cowling and exhaust nozzle, cockpit fl0or, bulkheads, landing gear struts etc. (36 parts).
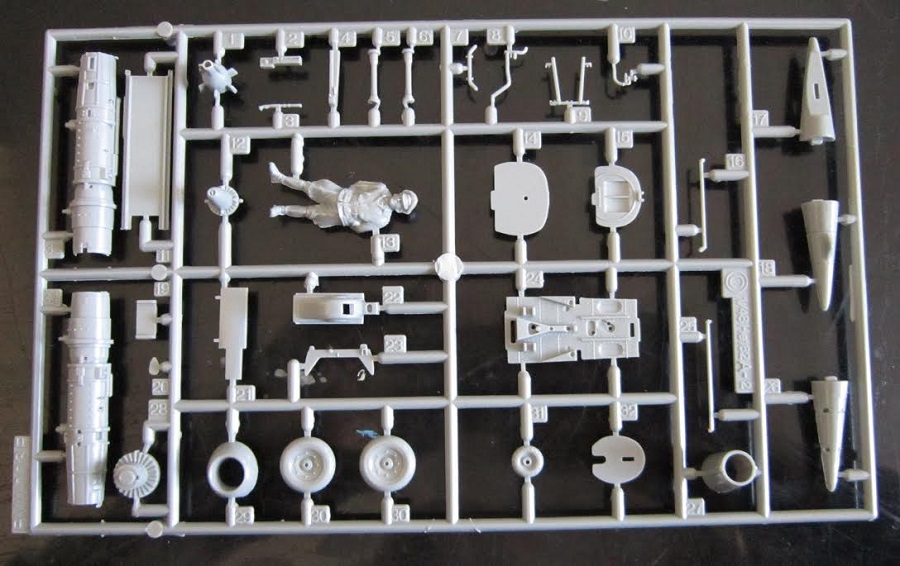
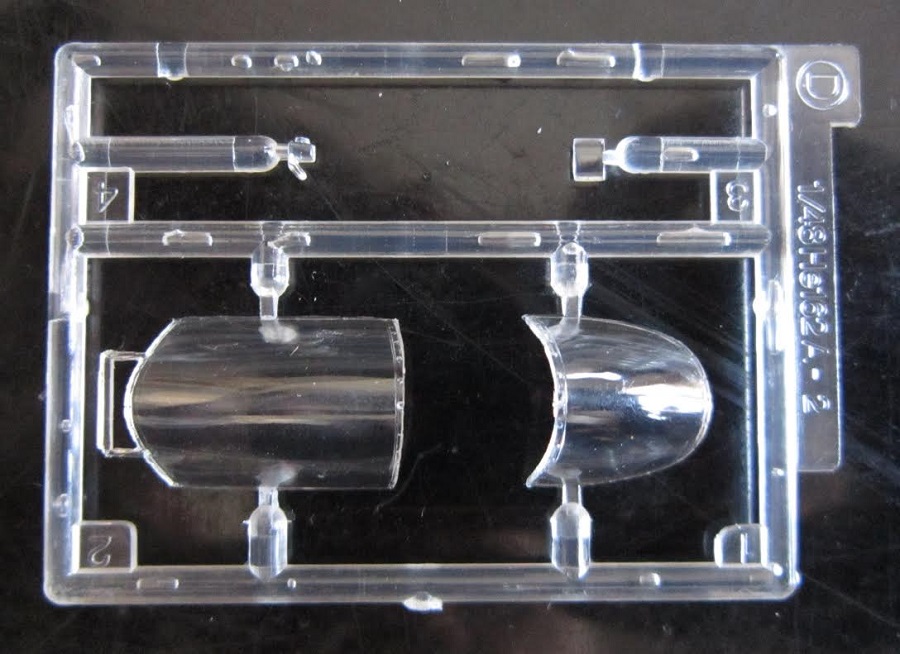
Clear letter D parts tree holds the cockpit canopy and 2 lenses (4 parts)
Stainless steel CA PE fret holds: the dashboard, foot pedals and many other parts that for the life of me I don’t see anywhere in the assembly steps??? (14 parts)
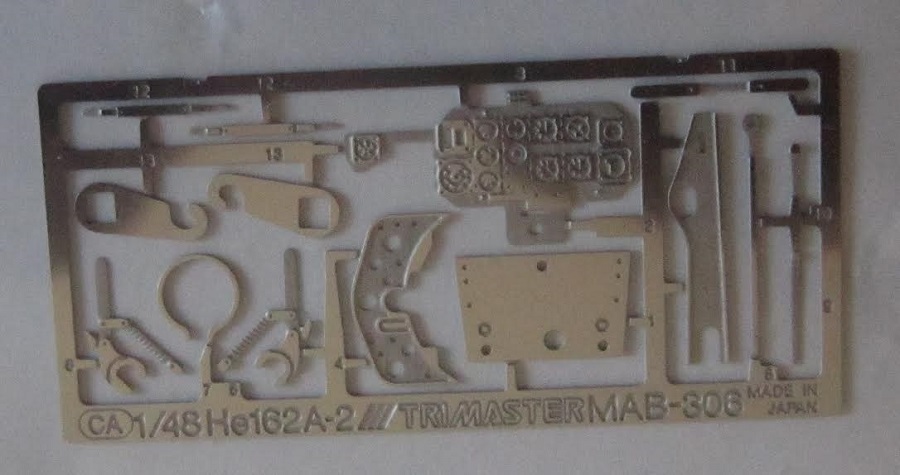
Stainless steel CB PE fret holds engine parts (4 parts) One part is blued out in the parts trees illustrations as being excess.

There are 2 identical stainless steel CC PE frets. They each hold nacelle door hinges. (2 parts per fret)

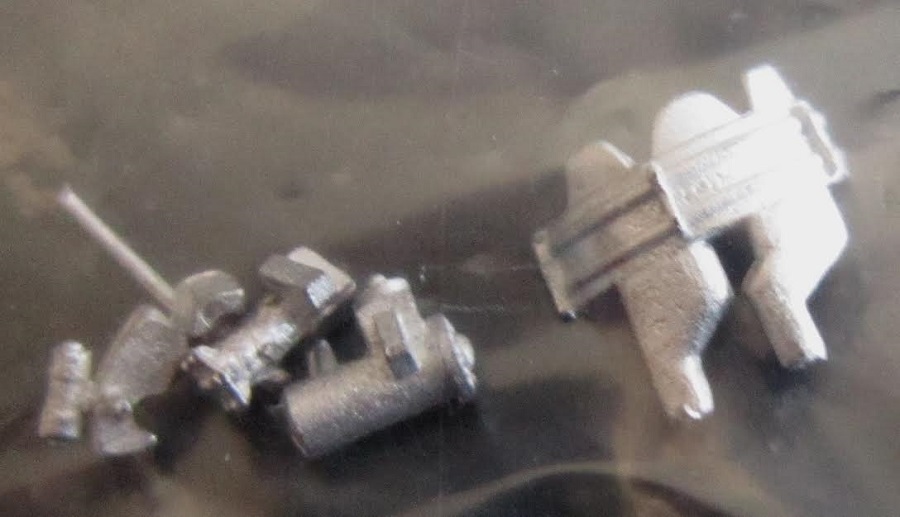
The white metal parts are next. There are 18 of them. They include: landing gear legs, pilot seat, nose ballast (to keep the aircraft sitting right on its tricycle gear), cockpit bracing etc.
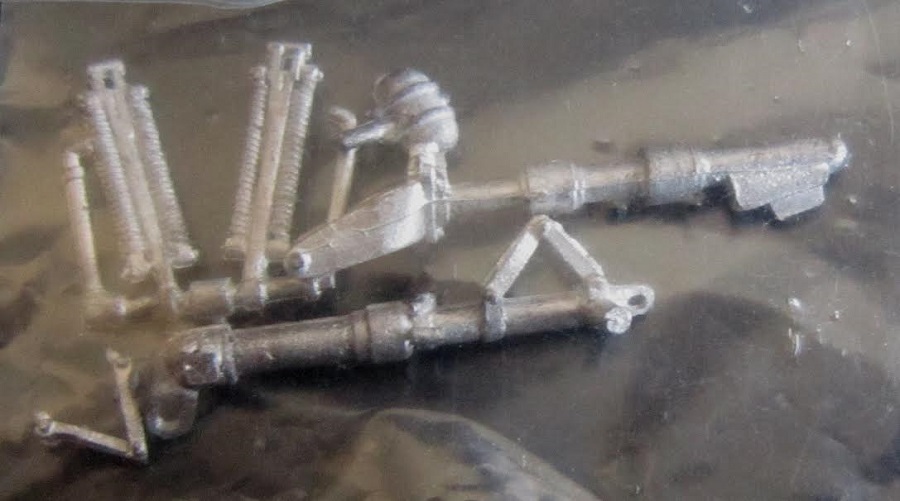


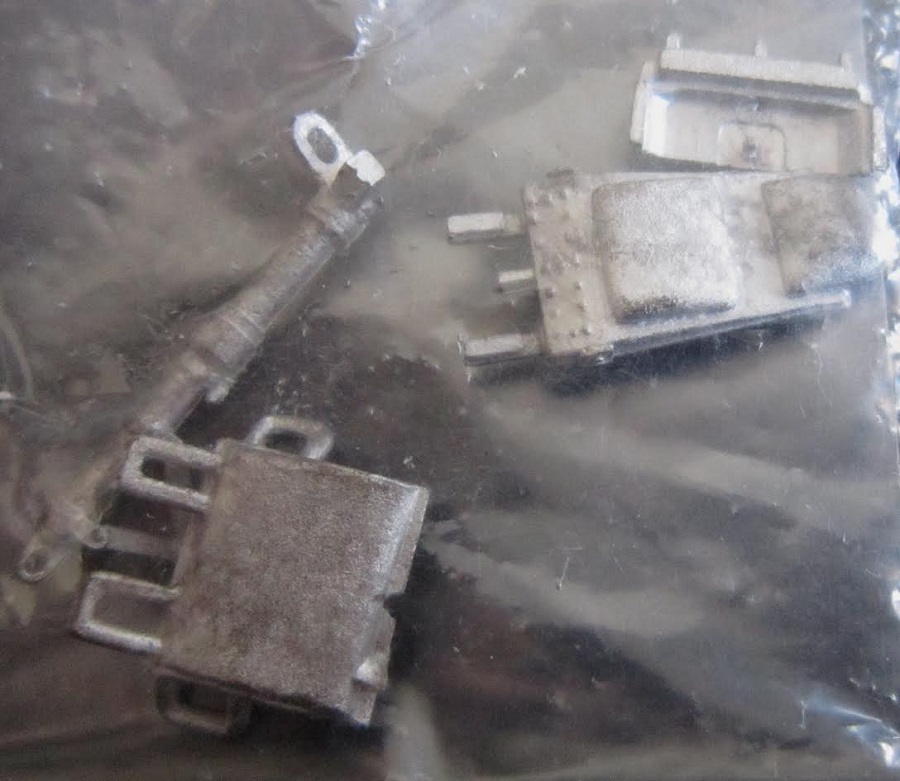

The final parts are the 6 wires and 2 metal rods and the decal sheet. The decal sheet also includes a lot of stencil markings.

These wires, rods, PE frets and white metal parts are all inside a tuck-end type box that is stapled to the walls of the tray down one end of it. Without this box in the kit the box would be 5” too long.
I recommend this kit only to modelers of advanced skills that have a few other kits that have multi-media type parts and this complexity under their belts. These kits were the cream of the crop years ago.
Kit was courtesy of my wallet.
Kit was courtesy of my wallet.
