
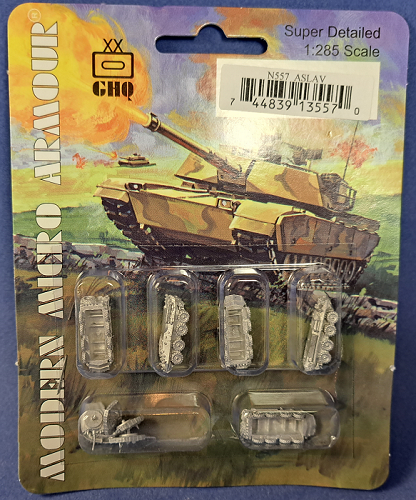
GHQ 1/285 ASLAV build review
SKU: N557
MSRP: $13.99 (about $2.80 per model)
John Kelley
MSRP: $13.99 (about $2.80 per model)
John Kelley
History:
The Australian Light Armoured Vehicle or ASLAV was made by Diesel Division of General Motors of Canada, now known as General Dynamics Land Systems-Canada and is an 8 wheeled vehicle based on the Marine Corps Light Armored Vehicle or LAV-25 and entered service in 1989 with the Australian Army for trials. After the trials Australia purchased an additional 97 LAV from Canada and has upgraded them since then. It has served in East Timor, Iraq and Afghanistan. The Boxer Combat Reconnaissance Vehicle started production in 2023 and is to eventually replace the ASLAV.
The Australian Light Armoured Vehicle or ASLAV was made by Diesel Division of General Motors of Canada, now known as General Dynamics Land Systems-Canada and is an 8 wheeled vehicle based on the Marine Corps Light Armored Vehicle or LAV-25 and entered service in 1989 with the Australian Army for trials. After the trials Australia purchased an additional 97 LAV from Canada and has upgraded them since then. It has served in East Timor, Iraq and Afghanistan. The Boxer Combat Reconnaissance Vehicle started production in 2023 and is to eventually replace the ASLAV.
The Model:
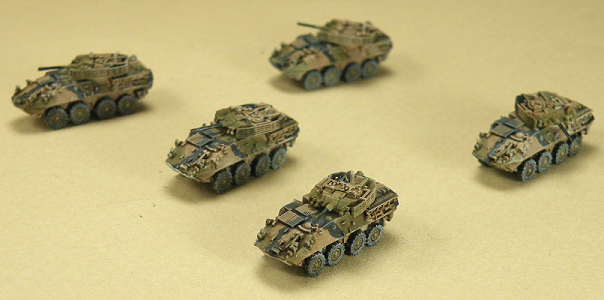
The GHQ model is an excellent reproduction of the vehicle in 1/285 scale. Molded in metal with a hollow hull bottom the detail is excellent. Even the bar armor on the turret has openings in it and the flash is minimal. I did find a little on the casting at the bow plate on the left side of one model but mostly it was a strand of metal that just need removed from the end of the main gun. Each pack contains 5 hulls and 5 turrets and no other parts so there really is no building except to add the turret to the hull. For the wargamer this is a great scale as a large force can be put on the table instead of just a few of the larger kits available.
The GHQ model is an excellent reproduction of the vehicle in 1/285 scale. Molded in metal with a hollow hull bottom the detail is excellent. Even the bar armor on the turret has openings in it and the flash is minimal. I did find a little on the casting at the bow plate on the left side of one model but mostly it was a strand of metal that just need removed from the end of the main gun. Each pack contains 5 hulls and 5 turrets and no other parts so there really is no building except to add the turret to the hull. For the wargamer this is a great scale as a large force can be put on the table instead of just a few of the larger kits available.
Painting:
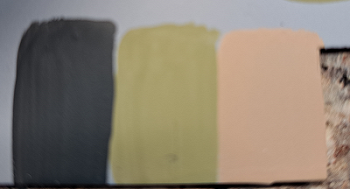
I primed the models with Tamiya Light Grey Primer on the top and bottom. After they had dried I added Blu-Tack on the bottom of the hulls and added a nail to it to hold the models better when painting as I did on the M1A1 (SA) review. I then began mixing paints from Vallejo Model Color for the AUSCAM camouflage.
Brown was mixed using 2 drops of Tan Earth 70.874 to one drop of Pale sand 70.837.
Green was mixed using 1 drop of Russian Uniform WWII 70.819 to 3 drops of Sand Yellow 70.916.
Black was mixed using 2 drops of Black Grey 70.862 and 1 drop of White Grey 70.993. This color was also used to paint the tires.
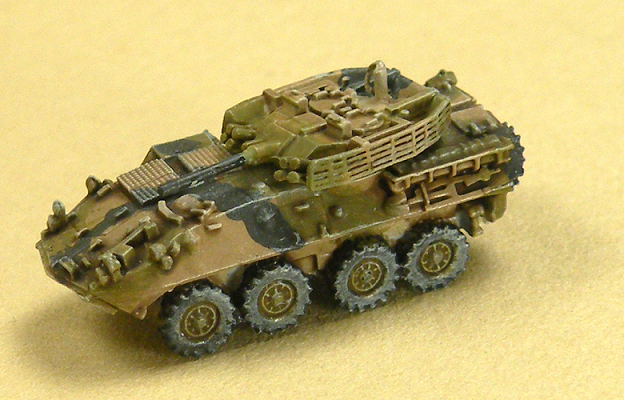
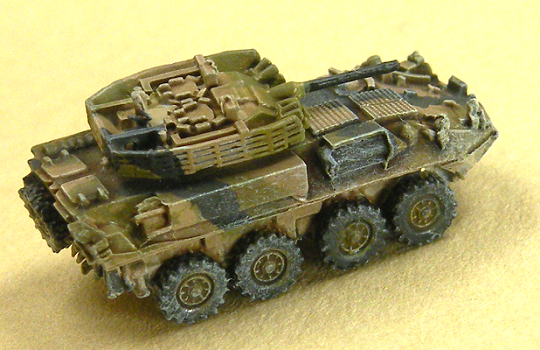
Once the finish coats had dried I shaded the model with Citadel Agrax Earthshade. The colors are quite light but are toned down with a shade wash. Since the models are so small (about 1 inch or 2.54 cm) I brushed painted them using a 5/0, a 10/0 and a small flat brush. I also used my wet pallet and I found this to be a great help as it kept the paint moist. There are numerous tutorials on the web that show how to make you own inexpensively. If I stopped painting until the next day the colors would separate but stirring them again brought them back to their mixed hue but they were a little thinner then the day before. The colors are not as dark on the model as in the photos so if you mix the paints as in this formula they will will be brighter. My photography is not as good as I would like it to be either.

Later I dry brushed the wheels and lower hull with the Pale Sand and lightly dry brushed the upper hull and turret as well to mute the colors a bit.
|
|
I will coat the models with Vallejo Matt Varnish at a later date as I intend to put them in a diorama.
I really enjoyed painting the models and the thing I liked most about them was that I could just paint and not worry about assembling or checking for accuracy. For wargaming, model building and painting I highly recommend the GHQ line of models.
I really enjoyed painting the models and the thing I liked most about them was that I could just paint and not worry about assembling or checking for accuracy. For wargaming, model building and painting I highly recommend the GHQ line of models.
Resources:
Trixiepara Military Modeling
Trixiepara Military Modeling
GHQ Miniatures
