
Rhomboids!
by Bill Bailey
John asked me to write something, anything, and for the longest time I couldn't think of a single thing. This is a small idea I have had rattling around in my head for a little while. I don't know if it will make a good article, but maybe it will be an amusing five minutes' read. My idea is to give a quick introduction to the subject and the kits available, and give some idea of what can be done with these kits to make them into something that is accurate and doesn't take an enormous amount of work.
If you work in "braille scale" and you want to build a British heavy tank from WW1, you have three choices; Airfix, Emhar, and Master Box. Between those three firms you can get a Mark I Male, a MkI Female, a MkII Male and Female, a MkIV Male, a MkIV Female, and a MkIV Tadpole Male. The only thing I want to say here about the Tadpole is that it was never used in action, and there is only the one contemporary photo of it with the mortar on the back. You can make of that what you will, but I should stress I like the kit, even though it has problems.
In case you are completely unfamiliar with British heavy tanks from WW1, they used the terms Male, Female, and Composite. These days, people say "Hermaphrodite" instead of Composite (which tells you what "Composite" means) and the term only applies to Mark V tanks, which we don't have, so we don't need to mention it again. Female tanks were armed with machine guns only. Male tanks had cannons as well as machine guns. I think it's a Freudian thing. You just get used to it after a while.
The Airfix Kits
Airfix make two kits that they call "Tank Mark I", a Male (about 50 years old) and a Female (about 5 years old). The Female kit contains all the parts to make a Male, and some extra bits to make a Female. The Male kit is slightly cheaper to buy.
The most important thing to note about both Airfix kits is they are not Mark I tanks. They are wildly inaccurate, and by "wildly" I mean "very". They are in fact, reasonably accurate Mark II tanks, because Airfix measured up The Tank Museum's Mark II tank when they were working up this model kit. At the time (the 1960s), The Tank Museum didn't have a Mark I, they had a Mark II dressed up with tail wheels to look like a Mark I. Airfix faithfully (almost) copied this MkII masquerading as a MkI. To make matters worse, it was no ordinary MkII. So much for the history of the kit, let's now see what we can we do with the Airfix kits.
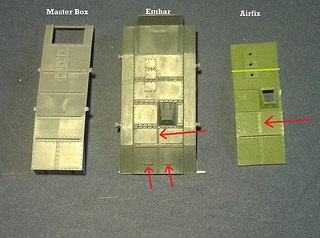
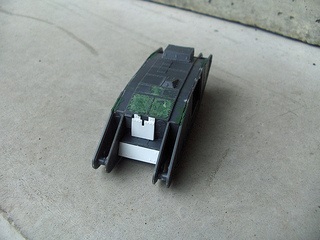
To be brief, I will just say that turning these kits into MkI is probably more trouble than it's worth, now that Master Box have made their fantastic MkI kits. The best use for these kits is to make them into MkII tanks. To do that you need to leave off the tail wheels, replace the Female's Vickers machine guns with Lewis machine guns, put an "L" beam across the roof of the Male sponsons, and eliminate the hatch in the roof at the front. You also need to remove a line of rivets, and add a rivetted strip between the second and third exhaust outlet, as shown in the photo below (red arrow shows rivets to be removed, green line shows where to add rivetted strip). Fold some paper or thin plastic strip to make little "hats" over the exhaust outlets in the roof and leave off the exhaust pipe and silencer. That would do it, as not all MkII tanks had a cargo box at the back, but you could add that detail if you wished.
The most important thing to note about both Airfix kits is they are not Mark I tanks. They are wildly inaccurate, and by "wildly" I mean "very". They are in fact, reasonably accurate Mark II tanks, because Airfix measured up The Tank Museum's Mark II tank when they were working up this model kit. At the time (the 1960s), The Tank Museum didn't have a Mark I, they had a Mark II dressed up with tail wheels to look like a Mark I. Airfix faithfully (almost) copied this MkII masquerading as a MkI. To make matters worse, it was no ordinary MkII. So much for the history of the kit, let's now see what we can we do with the Airfix kits.
To be brief, I will just say that turning these kits into MkI is probably more trouble than it's worth, now that Master Box have made their fantastic MkI kits. The best use for these kits is to make them into MkII tanks. To do that you need to leave off the tail wheels, replace the Female's Vickers machine guns with Lewis machine guns, put an "L" beam across the roof of the Male sponsons, and eliminate the hatch in the roof at the front. You also need to remove a line of rivets, and add a rivetted strip between the second and third exhaust outlet, as shown in the photo below (red arrow shows rivets to be removed, green line shows where to add rivetted strip). Fold some paper or thin plastic strip to make little "hats" over the exhaust outlets in the roof and leave off the exhaust pipe and silencer. That would do it, as not all MkII tanks had a cargo box at the back, but you could add that detail if you wished.

One of the things I'd like to try with the Airfix Male, is to turn it into a MkII Supply Tank. To do that, I just need to plate over the opening in the sponsons, add the "L" beam, remove the line of rivets, and leave off the tail wheels.

The hatch in the front of the roof in the Airfix kit is there because the real tank that they based this kit on, The Flying Scotsman, was a Supply Tank at some point in its WW1 career. A hatch was needed in the front because when the tank was loaded with supplies, the driver and commander couldn't get to the doors in the sponsons. To try to prevent any stores on the roof catching alight, some MkII Supply tanks had a silencer and short exhaust pipe fitted, just like the one in the Airfix kit.
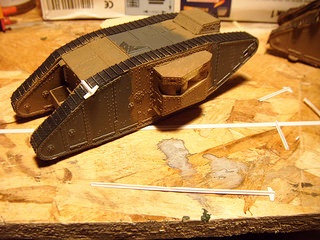
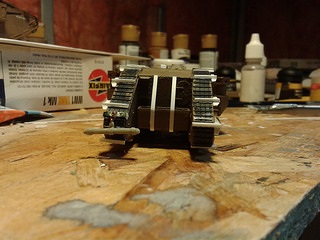
The Airfix tracks are horrible. Make sure the join is on the bottom, where it cannot be seen. I use superglue all the way around to hold the tracks on, and don't expect the two ends to meet; the tracks are short by about 1 cm. I fill the gap with anything because it doesn't matter, it's underneath. The problem with rubber band tracks is they bend in a way that real tracks don't. You can disguise this, or hide it, by adding grousers to the tracks. These are simple to make and everybody looks at them instead of the horrible tracks. The photos below are actually of an Emhar/Airfix chimera, but the Emhar tracks are still rather horrible (although nothing comes close to the Airfix monsters) and I wanted to show you home made grousers.
The Airfix tracks are horrible. Make sure the join is on the bottom, where it cannot be seen. I use superglue all the way around to hold the tracks on, and don't expect the two ends to meet; the tracks are short by about 1 cm. I fill the gap with anything because it doesn't matter, it's underneath. The problem with rubber band tracks is they bend in a way that real tracks don't. You can disguise this, or hide it, by adding grousers to the tracks. These are simple to make and everybody looks at them instead of the horrible tracks. The photos below are actually of an Emhar/Airfix chimera, but the Emhar tracks are still rather horrible (although nothing comes close to the Airfix monsters) and I wanted to show you home made grousers.

The Emhar Kits
Both the Male and Female Emhar Tank Mark IV kits have problems. Quite a lot of problems. In a nutshell those problems are: the Male sponsons are very much the wrong shape, the machine guns are Hotchkiss when they should be Lewis, the rear armour is missing, they have the extra line of rivets that Airfix invented, and the unditching rails are awful and the wrong shape.
How did Emhar make such an awful kit? Funny thing is, just as Airfix did, Emhar went to The Tank Museum and measured up the MkIV there. Now it just so happens that the Tank Museum's MkIV, "Excellent", has been messed about with a lot in its life. It was brought back into service in WW2 and some modifications were made. In short, Excellent is unique and not typical of MkIV tanks.
What can be done with the kits? Well, if you have the time and talent (and inclination) you can fix it up like John did. If, like me, you don't have that much talent, you can fix the easy stuff and hide the rest.
First, you have a big decision to make; Male or Female? If you want a Male MkIV you will have to replace or rebuild the sponsons. I can't rebuild them (I don't possess the skill), so in the past I have purchased replacement sponsons from Matador Models and Mister X Models (Modelltrans Modellbau also make replacement MkIV Male sponsons, but I don't own any so cannot comment on them). The Mister X ones are excellent, the Matador ones are slightly too small. But replacement sponsons are not cheap, so it's better to make a Female MkIV. The sponsons on Emhar's Female kit just need some details on the roof; a strip and some rivets, like in the first photo below.
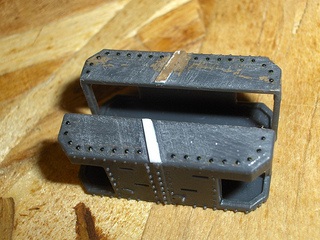

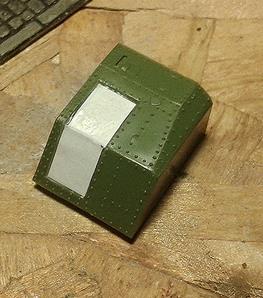
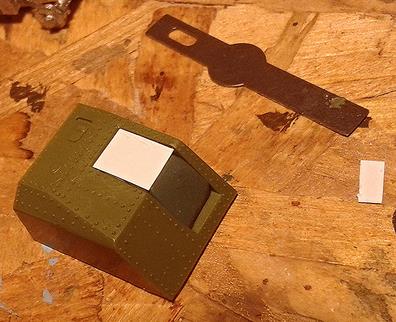
Assuming you're making a Female, you need to build it straight out of the box, being careful to put the petrol tank on the right way up (don't follow the instructions!), and leave off the unditching rails and Hotchkiss machine guns. The MkIV was first used in the Battle of Messines, June 1917, and at that time did not have unditching rails. So we can leave them off and we will have a MkIV model that is accurate for the Battle of Messines. The MkIV tanks sent out to Palestine, and the ones in Ireland also did not have unditching rails (but I believe only one or two Male tanks were used in Ireland, no Females). You will need to replace the MGs with Lewis guns. You can turn these out of brass, or whittle down some plastic rod. All the MkIV tanks had two plates of additional armour at the back, one protecting the petrol tank, and the other protecting the radiator. The Emhar kits do not have these, so you will have to make them. I made these with some thin plastic sheet, and I pushed a blunt knife into it to make the rivets (photo above). Contemporary photos will help. Next you need to deal with that irritating line of rivets that never existed, and two small hatches in the rear of the roof (only Excellent has these). Add grousers to the rubber band tracks, and she's starting to look pretty.
The Master Box Kits
Master Box make four Tank Mark I kits and two Tank Mark II kits. The MkI kits are fantastic but, sadly, not perfect. On the Male kits, you will need to cut a slit in both gun shields, to the left of the gun. You can build the kits with the anti-grenade "chicken coop" roof, but know that not all tanks used that roof and it was not standardised. Some modelmakers have stated the anti-grenade roof is not accurate, and if you have a problem with its accuracy, it can be left off and your model will represent the majority of MkI tanks. Similarly, if you look very closely, you might notice there are too many rivets on the tail wheel section. My fix for that is to cover it with a box for stowage. Many crews built wooden boxes on the tail wheels to carry spades, tarpaulins and other bits and pieces. For the MkI kits, those are the only things you need to take care of. I made the first video (below) years ago, and it shows most of the details just mentioned, the second video is from the Imperial War Museum and shows the gun sight slit very well.
It's a different story with the MkII kits. Unfortunately, Master Box have given these rounded track tensioner openings, whereas only the MkI had those. It's a distinguishing feature. MkII and onwards had squared openings. If you can live with it, that's great, because there isn't much you can do about it that doesn't require some delicate skills.
As I write this, my MkII Female kit is on its way to me, so I haven't actually seen it yet. When it arrives, the first thing I'll be checking is that it has Lewis guns and not Vickers, and then I might just put it together and paint it.
What Colour Were They? The question of colour comes up time and time again and, it's strange to say, will never really be settled it seems. There is a very good article, by Rhomboid, on the colours of the first tanks on Landships, here. And the start of this brief article, by Peter Kempf, offers some suggestions. For general notes on colour, and the reason why there will never be a definitive answer to what colour were the British tanks, read this Landships forum thread. So it seems there were two ideas about the colour: at first it was thought they needed camouflaging and two schemes were used (Solomon and "Subdued Solomon") and then when it was noticed that the camo was covered by mud (or, early 1917 if you will), they were painted a shade of brown. Would the paint have faded and got lighter? Would the paint have oxidised and gotten darker? Would chlorine gas have bleached it? Your guess is as good as anybody's. Paint it a colour you are happy with!
