
Build review of the Master Box Mk. 1 Male tank Somme 1916
Scale 1/72
Kit MB 72001
John Kelley
Kit MB 72001
John Kelley
Assembly
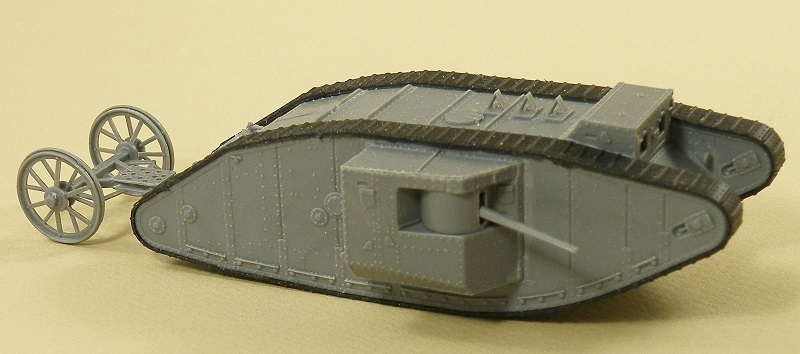
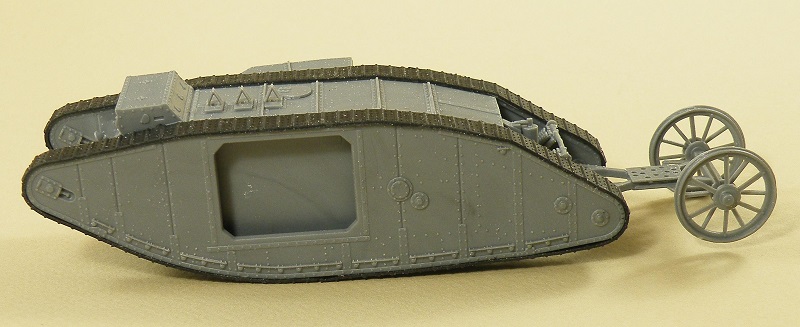
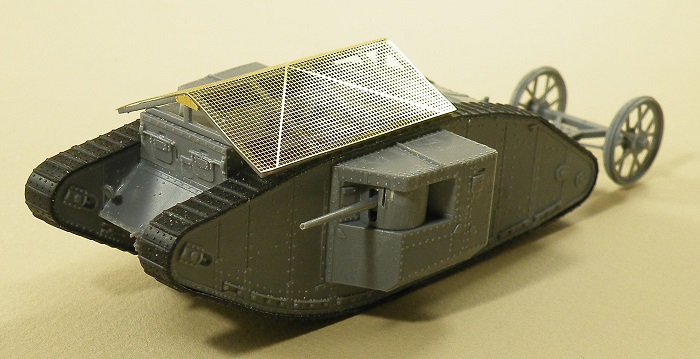
I began the assembly with step one by adding part C1, the glasis plate, to part C5, the lower hull. I left off all of the detail parts until the major assembly was done. I then added the rear plate, part C15, to the lower hull. I sanded both surfaces to ensure a tight fit. The hull roof was warped which meant that to eliminate the warp I would have to glue the roof in sections and let it dry to straighten it out. I waited until the lower hull and rear plate had set and then I attached the hull roof, part C2, by gluing the back of the part to the rear plate first and leaving the front part free. This was done because the warp in the roof was half way down the part to the driver's cab. This was allowed to set before proceeding any further. I deviated from the instructions at this point and began to attach the inside right sponson half, part C4, to the hull assembly. I fit the sponson inside the hull assembly and cemented small sections of the roof at a time and allowed them to dry before moving on to another section and cementing it, taping it along the way. I did the same thing with part C3, cementing in sections until the entire assembly was together. Now before going any farther do not do what I did and forget to add the steering gear assembly before attaching the left sponson part C3! Build up the steering gear assembly and trap it between the sponsons and start cementing the roof and lower hull to it. I had to apply tape to the driver's area of the roof to make sure it was level in all areas as I cemented it all together. This eliminated the warp in the roof and I than added the driver's cab.
I began the assembly with step one by adding part C1, the glasis plate, to part C5, the lower hull. I left off all of the detail parts until the major assembly was done. I then added the rear plate, part C15, to the lower hull. I sanded both surfaces to ensure a tight fit. The hull roof was warped which meant that to eliminate the warp I would have to glue the roof in sections and let it dry to straighten it out. I waited until the lower hull and rear plate had set and then I attached the hull roof, part C2, by gluing the back of the part to the rear plate first and leaving the front part free. This was done because the warp in the roof was half way down the part to the driver's cab. This was allowed to set before proceeding any further. I deviated from the instructions at this point and began to attach the inside right sponson half, part C4, to the hull assembly. I fit the sponson inside the hull assembly and cemented small sections of the roof at a time and allowed them to dry before moving on to another section and cementing it, taping it along the way. I did the same thing with part C3, cementing in sections until the entire assembly was together. Now before going any farther do not do what I did and forget to add the steering gear assembly before attaching the left sponson part C3! Build up the steering gear assembly and trap it between the sponsons and start cementing the roof and lower hull to it. I had to apply tape to the driver's area of the roof to make sure it was level in all areas as I cemented it all together. This eliminated the warp in the roof and I than added the driver's cab.
I was concerned that the tracks may not accept glue so I cleaned off the inside of the tracks and the outside of the sponsons with 91% alcohol and glued the tracks to them with super glue. The tracks were a little short so I pulled on both ends to stretch the tracks so they would fit better. Be careful when doing this as you can stretch them too much and they do not return back to their original shape. Master Box thoughtfully added a groove down the center of the sponson track plate and ridges on the inside of the tracks to positively locate the tracks in the center and aid in attaching them to the model. There is also an opening in the sponson bottom if you chose to melt the track pins down and this will allow the track to stay flat and not rise up. To remove the minor flash on the tracks I put a sewing needle in a #11 knife blade handle and heated up the needle using a candle. I drew the heated needle over the flash and this eliminated it.
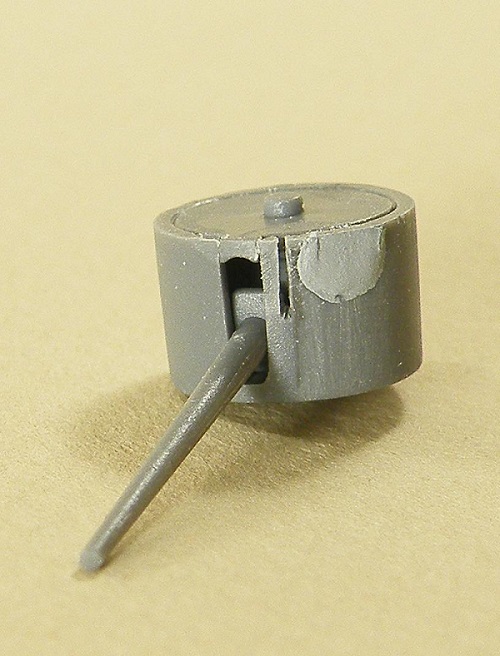
The gun shields are lacking the sighting slit so, looking at the front of the shield, I drew a vertical line to the right of the gun aperture about .064(1.625 mm) away from it. I cut the sight using a fine toothed razor saw and was careful to keep the saw straight. The sight length is cut to about the middle of the aperture. This can be done to both shields and on the same side on each one. I also drilled out the ends of the gun barrels.
The cab roof has the periscope port covers molded onto it so I added the periscopes from .030(.762 mm) plastic rod about .064 long. The periscopes were used when the vision ports were closed during combat and were long enough to see over the grenade screen spreader bar.


Tracks
This was another story. I found that my usual, The Army Painter Matt Primer, simply bubbled up on a test tree from the tracks and Tamiya Fine Surface Primer tended to crack if bent. Only acrylics adhered without a problem. To aid the paints adhesion I coated the tracks with Liquitex Matte Medium Fluid. Further research into painting vinyl type tracks reveled that craft paints worked quite well on this type of track. For the base coat I used Ceramcoat Brown Iron Oxide #02023. I mixed Ceramcoat Charcoal 02436 with varying amounts of Anita's Metallic Craft Paint 11206 Silver to replicate a natural steel color on the tracks from wear.
This was another story. I found that my usual, The Army Painter Matt Primer, simply bubbled up on a test tree from the tracks and Tamiya Fine Surface Primer tended to crack if bent. Only acrylics adhered without a problem. To aid the paints adhesion I coated the tracks with Liquitex Matte Medium Fluid. Further research into painting vinyl type tracks reveled that craft paints worked quite well on this type of track. For the base coat I used Ceramcoat Brown Iron Oxide #02023. I mixed Ceramcoat Charcoal 02436 with varying amounts of Anita's Metallic Craft Paint 11206 Silver to replicate a natural steel color on the tracks from wear.
Camouflage
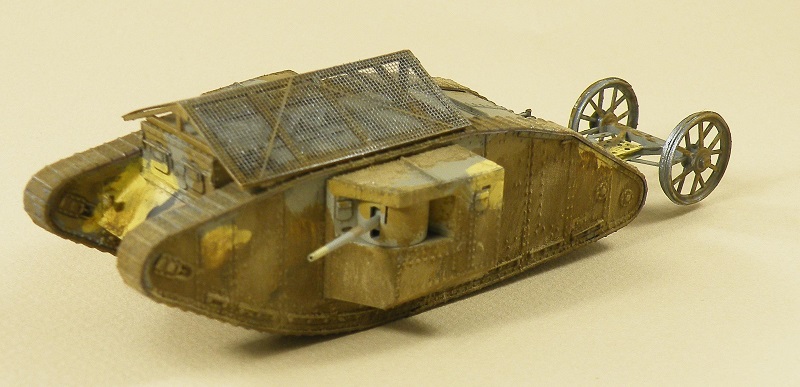
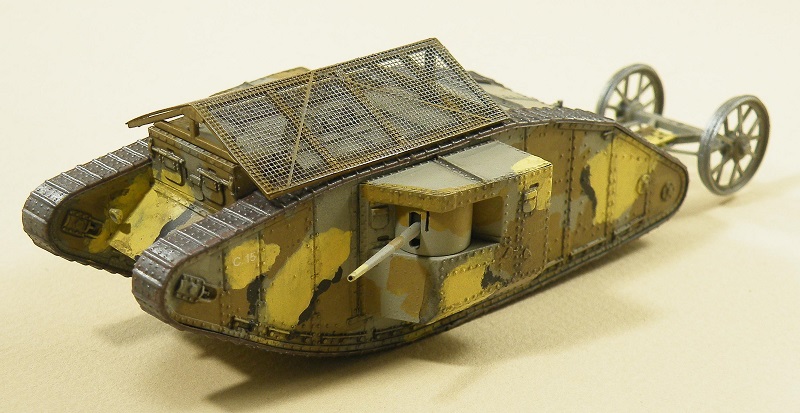
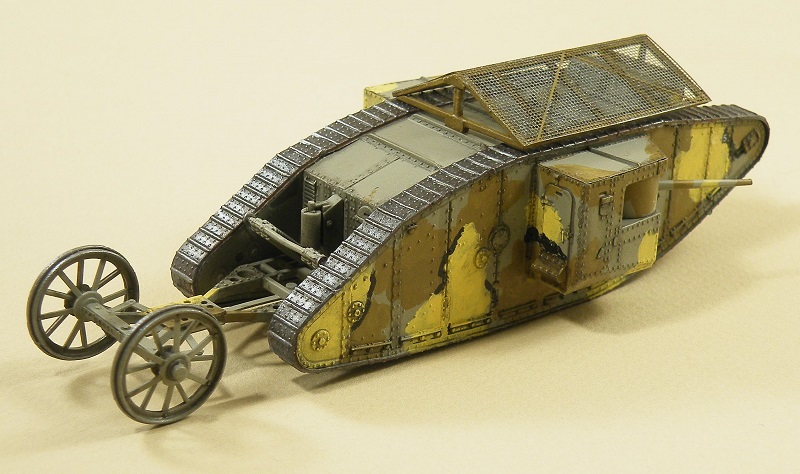
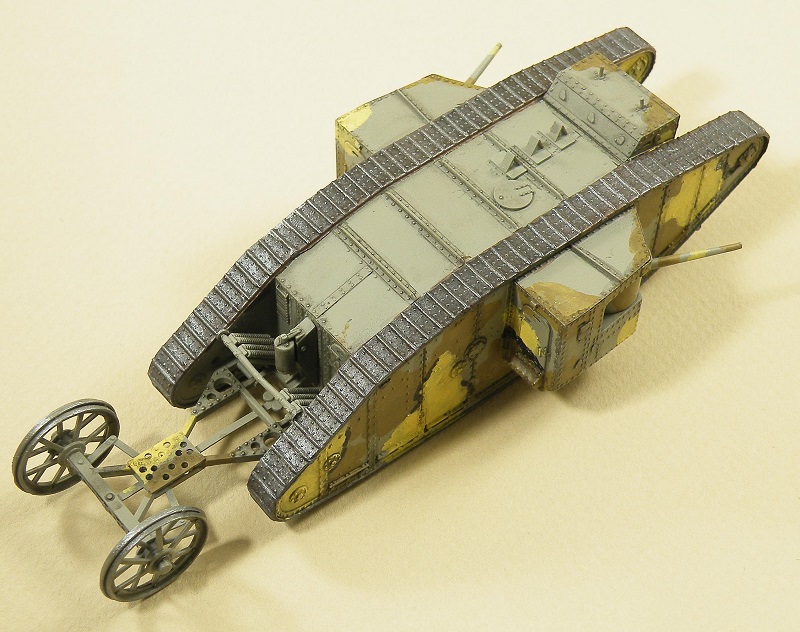
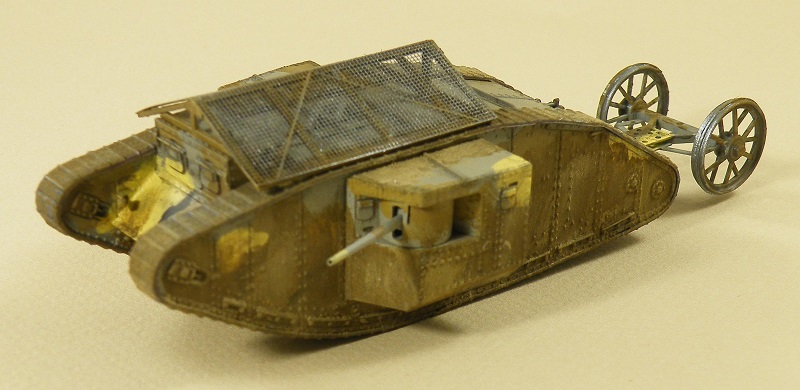
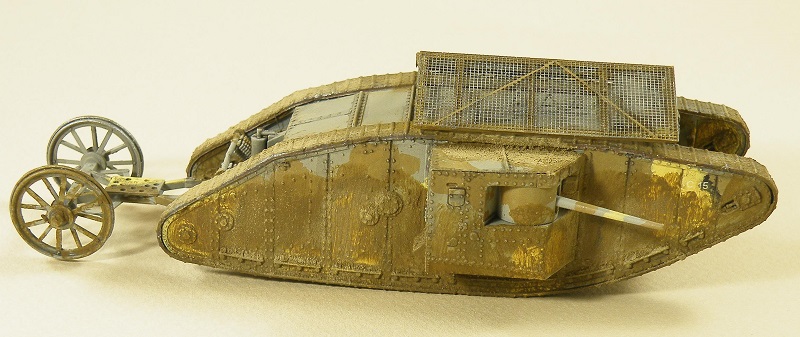
I wanted to do a modified Solomon camouflage scheme so for this I turned to the Landships 2 forum and did a search for "Solomon Camouflage" information. From this I painted the model with an overall base coat of Tamiya Medium Grey XF-20 with an airbrush. For the secondary colors I brush painted these using Vallejo Model Color 70.916 Sand Yellow and 70.873 U.S. Field Drab. The Black lines were added using 70.950 Flat Black. I didn't bother trying to make a neat pattern as the crews would have been in a hurry to complete the job before going into combat This is a very odd color scheme but as far as I can determine it is accurate. The grenade screen timbers were painted the Field Drab and the screen was painted Gun Metal Grey 863(179).
I wanted to do a modified Solomon camouflage scheme so for this I turned to the Landships 2 forum and did a search for "Solomon Camouflage" information. From this I painted the model with an overall base coat of Tamiya Medium Grey XF-20 with an airbrush. For the secondary colors I brush painted these using Vallejo Model Color 70.916 Sand Yellow and 70.873 U.S. Field Drab. The Black lines were added using 70.950 Flat Black. I didn't bother trying to make a neat pattern as the crews would have been in a hurry to complete the job before going into combat This is a very odd color scheme but as far as I can determine it is accurate. The grenade screen timbers were painted the Field Drab and the screen was painted Gun Metal Grey 863(179).
Weathering
I gave the model an airbrushing of Pledge Floor Wax with Future and letting this dry overnight. I added the tank numbers C15 from Black Lion decal sheet 72001 World War One Mk. I - III adding more Future to set the decals. The Black Lion decals went on without a problem and I highly recommend them for any WW1 kit. Once this had set I gave the model a wash of Vallejo Game Color 72.045 Charred Brown thinned heavily with water. Once dry I took a brush dampened in water and removed the tide pools and the paint covering the detail so no dry brushing was needed. Vallejo Matt Varnish 70.520 was airbrushed over the model to give it a flat coat.
I gave the model an airbrushing of Pledge Floor Wax with Future and letting this dry overnight. I added the tank numbers C15 from Black Lion decal sheet 72001 World War One Mk. I - III adding more Future to set the decals. The Black Lion decals went on without a problem and I highly recommend them for any WW1 kit. Once this had set I gave the model a wash of Vallejo Game Color 72.045 Charred Brown thinned heavily with water. Once dry I took a brush dampened in water and removed the tide pools and the paint covering the detail so no dry brushing was needed. Vallejo Matt Varnish 70.520 was airbrushed over the model to give it a flat coat.
Mud
For this I used a mixture of Vallejo Pigments 73109 Natural Umber with a little 73104 Light Sienna added to it. To make the mud I added a drop of Liquitex Matte Medium Fluid and enough water to make a slurry. This was streaked on to the hull sides vertically as well as being applied to the tracks, steering gear and between the horns. Light Sienna was dusted on using a brush which gave some different hues to the mud. For the lumps of soil I added the slurry and then used a brush to add dry pigment to it. For me adding the mud was the fun part as I could take my time and experiment with different effects.
For this I used a mixture of Vallejo Pigments 73109 Natural Umber with a little 73104 Light Sienna added to it. To make the mud I added a drop of Liquitex Matte Medium Fluid and enough water to make a slurry. This was streaked on to the hull sides vertically as well as being applied to the tracks, steering gear and between the horns. Light Sienna was dusted on using a brush which gave some different hues to the mud. For the lumps of soil I added the slurry and then used a brush to add dry pigment to it. For me adding the mud was the fun part as I could take my time and experiment with different effects.


In the end...
This is a very accurate model of the Mk. 1 Male tank and it was a real pleasure to build. Even with gluing the roof in sections I was done with the build in about two days( allowing for drying time) and I did not need to use any filler. The tracks were made of a material that allowed me to glue them using super glue after I had cleaned the mating surfaces with the alcohol.
My only change from the kit is the addition of the gun sight slit and drilling out the barrel ends. This is a must have kit for anyone interested in WW1 armor and I highly recommend it. I am really looking forward to the Gaza versions and hopefully some more after market decals will become available to make different schemes of the kit. I purchased this model from my local hobby shop.
Resources
1. http://landships.activeboard.com/t7239978/solomons-camouflage/_
This is the thread that I found very helpful in discussing the Solomon camouflage and gives information on the appropriate colors.
2. http://www.landships.info/landships/tank_articles.html#
This is an article written by "Rhomboid" explaining the Solomon scheme and the colors that were used. It is located in "Camouflage and Markings."
3. Osprey New Vanguard Publications "The British Mk.1 Tank 1916"
David Fletcher and Tony Bryan ISBN-13: 9781841766898
This book is available from a number of sources and is very helpful. The color plates are quite useful and there are a number of very good photos.
4. www.landships.info
This is the premier site for everything pertaining to land warfare during the First World War. The forum is excellent and people are always happy to help out anyone asking a question whether it is about modeling or history . This site is the source that Master Box used in developing their kit, and plans for the Mk. 1 are available on the site courtesy of Helen Lawson.
5 Black Lion Decals at http://www.blackliondecals.nl/
Black Lion makes decal sheets in 1/72 and 1/35 for British, French, German, Italian and Russian armored vehicles.
