Dragon 1/72 LRDG Patrol Car
Vic Russel Jr.
Kit 7439
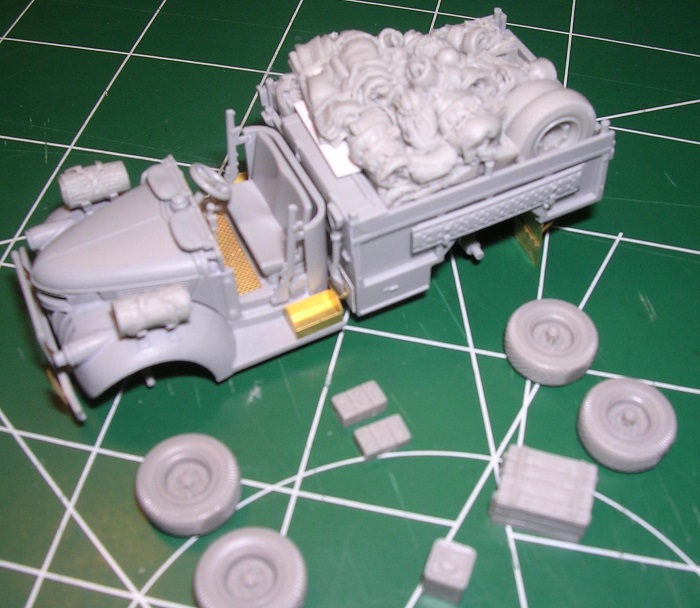
I have wanted to build this kit since it first was released, BUT, the details were a bit soft in a few areas and the hollow wheel backs were just unacceptable to me so I waited it out. Then I saw that there were wheels released by Blackdog and photo etch released by Hauler for the kit and Scott Woodward at Wanamaker Guns and Hobbies got me the needed items. I also got the Blackdog bed load as well from Scott, as it was very common to see pictures with loads as opposed to empty.
So no excuses now, 21 August 2013, I cut the plastic and got started. It has been a journey up until now, working on the LRDG only every other week with my work schedule and family time. Some of my attack plan is listed below on how I built up the kit. The Hauler photo etch set was not fully or even half used. I used the instrument/dash panel, driver compartment floor, radiator mesh, rear mud flaps, front bumper rear push bar supports, gas cans/running board holders and shovel blade rest. I used the complete bed load and wheels from Blackdog.
Getting started, I realized that much of the photo etch, due to size, is unusable by me. I just used some of the stuff that really needs replaced on the Dragon kit due to soft detail. I'll break down what I did for the most part. In reference to the painting steps, I typically airbrush everything I possibly can, except maybe the detail and fine painting.
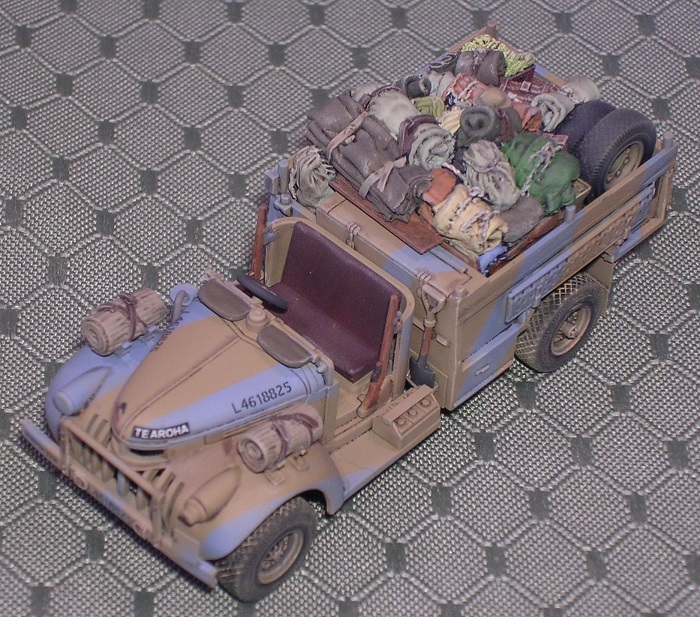
The forward “cab” of the truck has had the photo etch floor added, resin sand traction rolls added to the front fenders using the kit stock holders that were thinned down, the photo etch dash panel and fuel can holders mounted on the side running boards. The front bumper vertical brush guard uprights were significantly thinned and the photo etch rear upright supports were used as was the photo etch number plate for the front bumper as well.
The chassis was assembled mostly box stock being careful of alignment for the wheels. I drilled out the exhaust and cleaned up the seams as I went along with little effort in this part of the build, just keeping things aligned. The wheels needed to be drilled out slightly for the back, but the front holed are oversize and this should allow for lining up the “stance” of the vehicle when attached with CA thick.
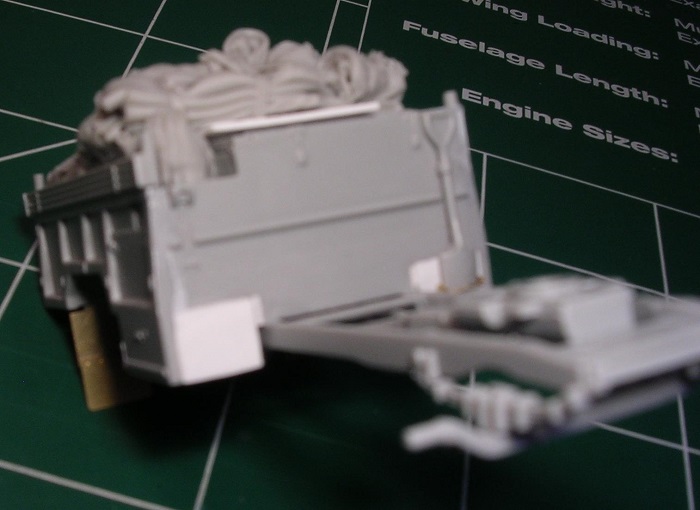
The bed of the truck was some work. Getting things to fit and aligned was a lot more work than I expected. I had to clean out the bed molded alignment ridges for the kits “overly soft detailed cargo. Then I added the front vertical wall after assembling the storage box directly behind the cab length wise from left to right. The storage box in the bed behind the drivers seat was not added as the Blackdog load replaces it. I then got the front of the bed attached and the lower cargo bins in front of the rear axle. Lots of fit challenges here, with sheet/strip styrene fixing this. Once this was all dry and I was happy with the corrections, I had to adjust the resin bed load to fit with a few cuts of the razor saw and a hobby knife. Then I glued the bed to the chassis (would have preferred not to) to square up everything for alignment of the wheels in relation to the wheel wells. I then added the photo etched mud/dust flaps without issue. The front had to be fitted to the chassis for reference as the back was glued on, but is separate for completion of the build through painting. In some cases I adapted the plastic parts or replaced with Evergreen Plastic as opposed to photo etch for the 3 dimensional look.
So no excuses now, 21 August 2013, I cut the plastic and got started. It has been a journey up until now, working on the LRDG only every other week with my work schedule and family time. Some of my attack plan is listed below on how I built up the kit. The Hauler photo etch set was not fully or even half used. I used the instrument/dash panel, driver compartment floor, radiator mesh, rear mud flaps, front bumper rear push bar supports, gas cans/running board holders and shovel blade rest. I used the complete bed load and wheels from Blackdog.
Getting started, I realized that much of the photo etch, due to size, is unusable by me. I just used some of the stuff that really needs replaced on the Dragon kit due to soft detail. I'll break down what I did for the most part. In reference to the painting steps, I typically airbrush everything I possibly can, except maybe the detail and fine painting.
The forward “cab” of the truck has had the photo etch floor added, resin sand traction rolls added to the front fenders using the kit stock holders that were thinned down, the photo etch dash panel and fuel can holders mounted on the side running boards. The front bumper vertical brush guard uprights were significantly thinned and the photo etch rear upright supports were used as was the photo etch number plate for the front bumper as well.
The chassis was assembled mostly box stock being careful of alignment for the wheels. I drilled out the exhaust and cleaned up the seams as I went along with little effort in this part of the build, just keeping things aligned. The wheels needed to be drilled out slightly for the back, but the front holed are oversize and this should allow for lining up the “stance” of the vehicle when attached with CA thick.
The bed of the truck was some work. Getting things to fit and aligned was a lot more work than I expected. I had to clean out the bed molded alignment ridges for the kits “overly soft detailed cargo. Then I added the front vertical wall after assembling the storage box directly behind the cab length wise from left to right. The storage box in the bed behind the drivers seat was not added as the Blackdog load replaces it. I then got the front of the bed attached and the lower cargo bins in front of the rear axle. Lots of fit challenges here, with sheet/strip styrene fixing this. Once this was all dry and I was happy with the corrections, I had to adjust the resin bed load to fit with a few cuts of the razor saw and a hobby knife. Then I glued the bed to the chassis (would have preferred not to) to square up everything for alignment of the wheels in relation to the wheel wells. I then added the photo etched mud/dust flaps without issue. The front had to be fitted to the chassis for reference as the back was glued on, but is separate for completion of the build through painting. In some cases I adapted the plastic parts or replaced with Evergreen Plastic as opposed to photo etch for the 3 dimensional look.
Color schemes are an area that will cause you to stop and pause for what you want. Middlestone or Pink base color. Azure Blue, Dark Green or Purple second colors? Many options are documented and can be endless as per the numerous refernces out there that I used, to include the internet and just googling “LRDG”. For paint, if I prime, typically a Model Master Enamel thinned with Laquer Thinner. For color I use, preferably, Tamiya Acrylics thinned with 91% Rubbing Alcohol, sealed with Model Master Clear Flat Lacquer with each color to make the finish a bit more durable while handling.
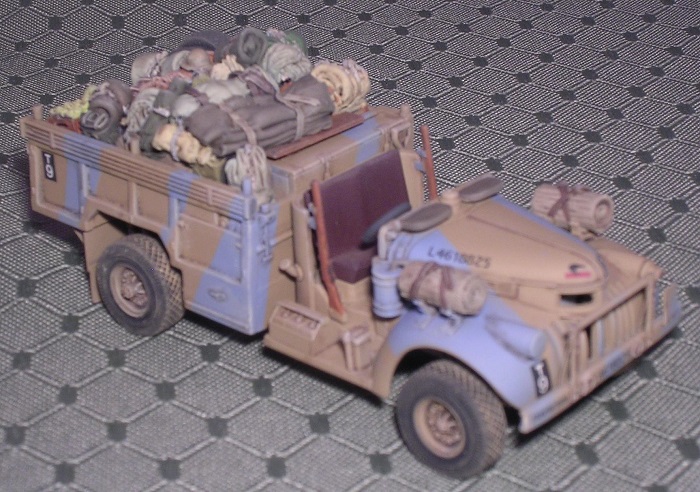
Painting began with a coat of Model Master 1740 (36231 Dark Gull Gray), thinned 50/50 with Laquer Thinner, over all surfaces, be it plastic, resin or photo etch. After a few touch ups of some seems and a few other defects, one more coat of MM1740. To begin the color, I airbrushed the resin load, wheels, the front cab area underneath and some bed structure XF1 Flat Black, Then I mixed 2 parts XF59 Desert Yellow and XF60 Dark Yellow and 1 part XF57 Buff and painted the forward cab top surfaces and hood areas on the areas that can't be painted once the hood and the forward cab area are glued together. Then, once dry, I glued the hood with the dash panel to the forward cab and filled the smaill seams with Mr. Surfacer 1000 and after a few hours, cleaned up the seams with Mr. Thinner and a Q-tip. Now I am ready to paint the vehicle in 2 assemblies, the forward cab/hood assembly and the bed and chassis assembly. I airbrushed the above paint mixture and for the Blue, I used Model Master Enamel 2048 RAF Azure Blue thinned with Laquer Thinner and the seperation lines were masked with Tamiya tape cut into thin strips using a metal straight edge. The seat was airbrushed Tamiya XF-9 Hull Red. I then glued the wheels on with CA and used a few different metal straight edges and right triangles to ensure they are square and set evenly on a flat surface. Then I mixed some more of the base color and, using a circle, guide airbrushed the wheels on the vehicle and the resin load. I then laid down a few coats of Model Master Gloss Clear and after a day, decaled the vehicle using the Micro Scale System (my Blue Micro Set still had an Ed Shock's price tag on it from the mid 80's when my Dad worked at the shop part time, and it performed flawlessly). The next day, a few more coats of Gloss was airbrushed on again. I then thinned some Winsor & Newton Raw Umber Raw Umber Oil paint from the “tooth paste tube” with Humbrol Thinner for a wash and applied where I saw all the crevices and nooks and crannies. I use Raw Umber since it's a Dark Brown, NOT, Black. The vehicles colors are ralatively light and Black would be to stark. After the oil wash dried for a few days, I airbrushed some Model Master Clear Flat in a few light coats and it toned everything down and evened the finish out.Then I dry brushed Model Master Enamel 1706 Sand on all the highlights, but keeping it restrained. This then gets another coat of Model Master Clear Flat via the airbrush.
I then finished the assembly of the forward “cab” to the chassis and continued on with detail painting and weathering as listed below.
Detail painting, where to begin. Guess the starting point is using Vallejo Acrylics. I use them and they are tinned with tap water on a paper plate with the coating that has that “waterproof” effect. I shake the bottles well and make sure the colors are well mixed (shaking is the only way I have done it, the longer they sit, the more work it is to shake) I then squeeze out a few drops (just like eye drops containers) and I dip my brush in water and stir it in as needed for effect. I actually thin the colors quite a bit (no magic formula, trial and error) and then brush on a few coats to build them up as opposed to a thicker coat that can show brush strokes and hide fine detail. For colors for the load items, I just went to the Vallejo color rack and picked colors, no rhyme or reason, just did it this way and added to my Vallejo paint collecton as well.
I then just started painting the colors on the deepest details first and with the lightest colors and then working my way out and to the darkest colors. I then clear glossed and did the wash as above for the vehicle and it really brought out the details and I airbrushed on the Model Master Clear Flat. Set the load into the vehicle and realized some of the details I thought that would not be seen were, then I looked closer and realized I missed a few items in the load as well. When you stare at this for a few days, things tend to blur together and it's small and detail painting and on small items such as load ropes and straps, and not using a magnifier, just my transition lenses. Guess I might need to look into a magnifier like everyone else. So these glithces were corrected and the load was set in and it was all good for the load. For the other detail painting for the steering wheel, rifles, small folded down front windows with covers on and such items, Vallejo was the paint of choice. The rifle metal was added by a .3mm mechanical pencil for ease of control and it just “looked right”. In the end weathering was kept to a minimum as I wanted to keep it as a newer vehicle, just readied for a mission.
For the completion I applied another coat of Model Master Clear Flat Laquer with the airbrush. After I got a few mist coats on, I added a drop of Tamiya XF-57 Buff to the mix and more Laquer Thinner (Tamiya acrylics are a hybrid, they are alcohol based, so you can mix them with Laquer thinner) and thin misted on a dust coat. With in 30 minutes I applied Mig Pigments Gulf War Sand to the tire tread for in the treads and cleaned the “rubber that meets the road” with a slightly damp Tamiys “Q-Tip” and removed the excess. I built this with a finish that wasn't over the top with sand and dust to hide all the work that I did.
So for the overall view of the Dragon LRDG Desert Patrol Vehicle. I love the result, BUT, I just can't get past the kits lack of detail, especially compared to the other kits that I have built. The 2 that come to mind are the Panzer IV Ausf (F1) and the IJA Type 95 Ha-Go which were very well designed and sharply detailed kits. I have the LRDG Vehicle with the 2cm cannon that I am going to give to John Kelley for a counter review and I have included the resin wheels which is the largest lack of detail in the kit. I started this kit on 21 AUG 2013 and finished on 11 DEC 2013, a lot longer than it should have, I did have to make my self work on it and push forward to finish the project and gladly so with seeing the results. I do have a 1/35 Tamiya LRDG version that I am looking forward to of this same vehicle and it should be a lot less work with all the reviews and finished kits I've seen. I do have a few more Japanese 1/72 Dragon vehicles to do, but again, the detail is much better than the LRDG series.