
In Box Review of Ertl/Esci 1/9th Scale
Harley Davidson WLA-45 Motorcycle
Kit no. 8291-8241
OUT OF PRODUCTION
By Ray Mehlberger
OUT OF PRODUCTION
By Ray Mehlberger
HISTORY:
The Harley Davidson WLA-45 was basically designed from a well-known civilian model. This Harley Davidson was specially manufactured for the U.S. Army in the WLA series (several thousand were built). This model was widely used by the Americans and the Allies during the Second World War. It can be considered one of the most typical American motorcycles of that period, both because of its design and its technical characteristics.
ESCI was a model company based in Italy. They went out of business, but for a time some of their model subjects were sold under the Ertl label. Ertl is based in Dyresville, Iowa. Ertl was sold and the new owners do not make plastic model kits anymore and the company has changed hands several times.
THE KIT:
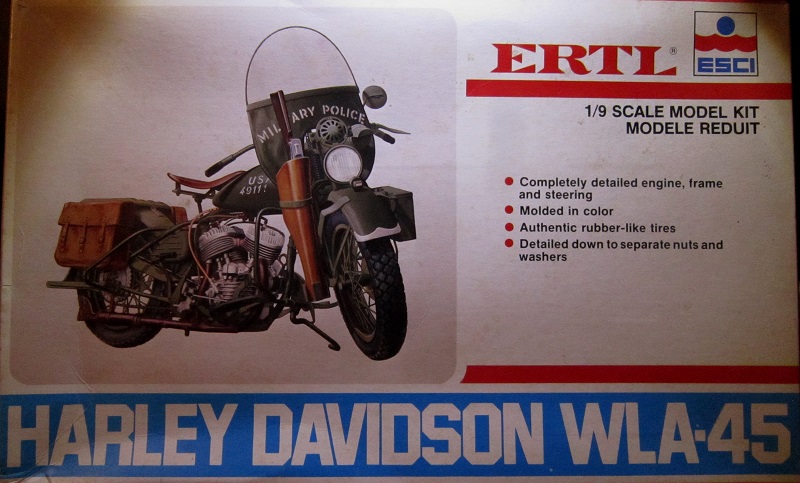
The kit came in a tray and lid type box. The box art shows a olive green Harley in the markings of the U.S. Army military police with the serial no. 49111 on the sides of the fuel tank. This color illustration spans only one half of the box lid.
Kit features are a completely detailed engine, frame and steering, molded in color, authentic solid vinyl tires and detailed down to separate nuts and washers in places. It has a working front suspension with metal coil springs, a flexible drive chain, vinyl tubing for brake and clutch lines, a clear plastic display name plaque. It includes handle bar grips, straps, windshield, saddle bags, and a Thompson machine gun with carrying case. There are license plates for U.S. Army, Greek Army and 82 Airborne Division.
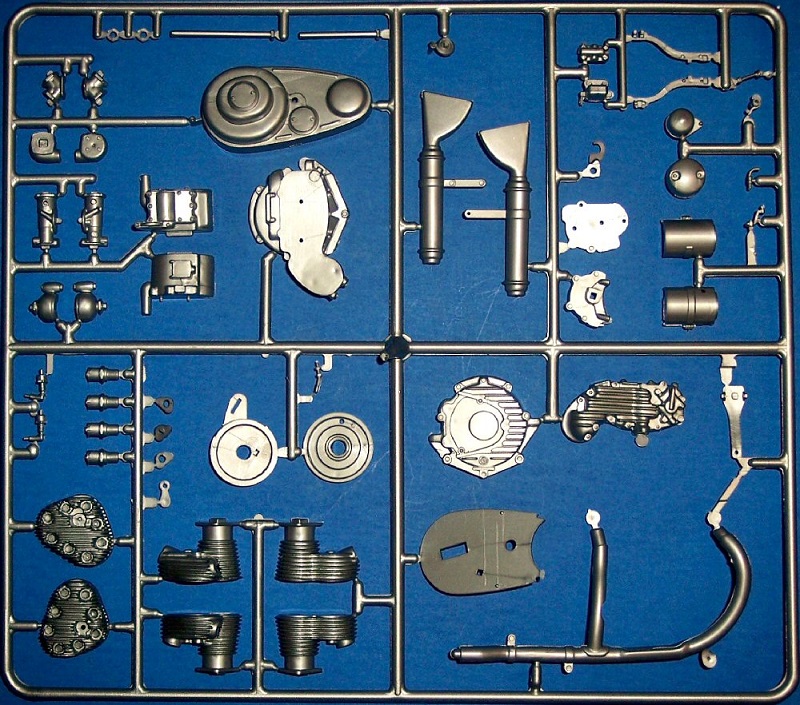
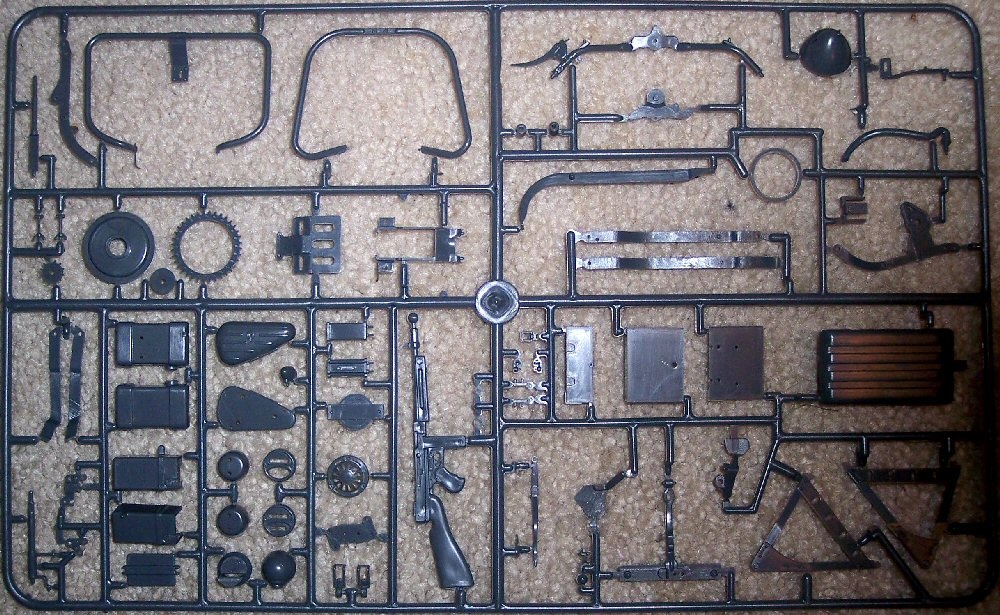
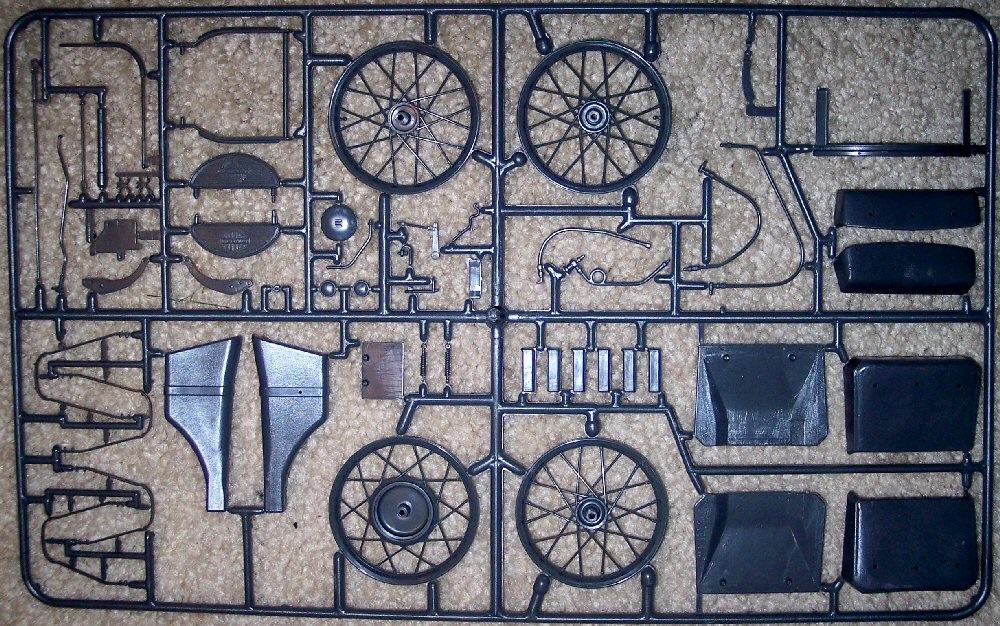
Inside the box are three large olive drab colored parts trees packed in a cello bag.
A second cello holds a large silver colored parts tree, a medium sized black vinyl parts tree, and a tree of clear parts.
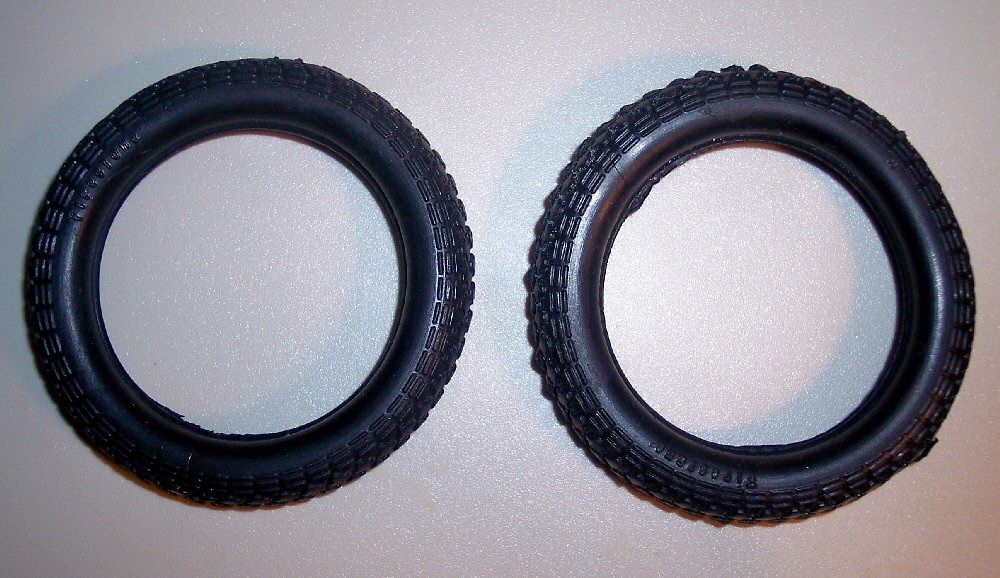
Two hard vinyl tires are loose in the kit. These have great tread detail and raised lettering saying “Firestone” on them.
There is a small cello with wire sleeving and metal springs in it.
The decal sheet and instructions complete the kit’s contents.
I am going to dispense with my usual habit of naming parts on the trees. There are just too many parts and I’d be sure to miss-name some. So, please just look at the photos to see what’s there this time.
The instructions consist of a stapled booklet, eight ½” x 11” format of 12 pages length.
Page one of the instructions begins with a black and white illustration of a Harley Davidson in the markings of the U.S. 1st Army, followed by a history of the motorcycle in English and French.
Page two begins with some general assembly instructions, followed by “special modeling tips”.
Pages three and four have the parts tree drawings and assembly symbol explanations. Also a description of the sequence of assembling steps in English and French.
Pages five through 10 have numerous exploded assembly drawings, but these steps are not numbered and on pages six and seven are really jumbled together. A lot of care is going to be needed to get things assemble right and this kit is definitely NOT for the novice modeler. The assembly drawings are literal SPIDER-WEBS and hard to determine where things go together. Esci should have made more assembly step illustrations that are not so busy. I shudder to think of trying to get this together right.
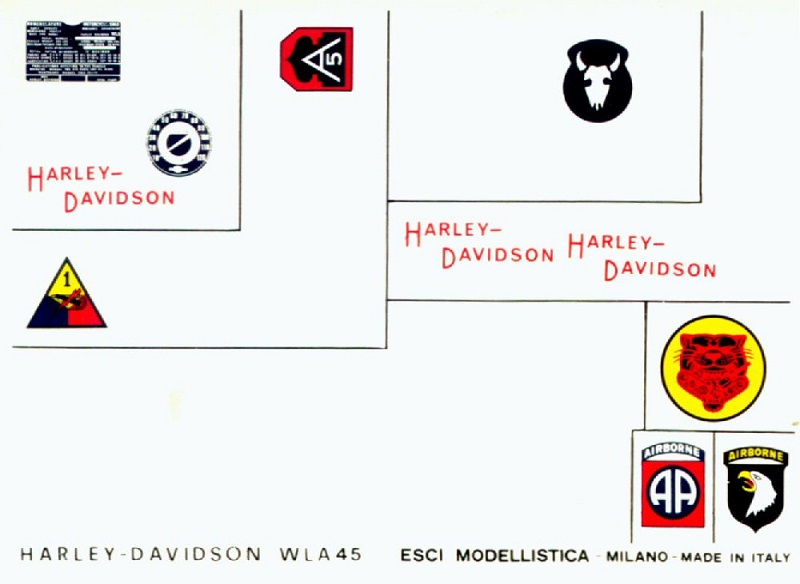
Page 11 shows the markings on the decal sheet and lists what they represent. However, this listing in the French language describes all 22 marks, but the English language listing below it only goes to 17. So, you will have to wind up translating the French listing of the five that are missing off the English list. Bad move ESCI.
Below this, the instructions say that:
“The camouflage was a dull dirty green and the typical coloration used by the American Armed Forces. When used in desert areas it was in a fairly common light sandy color. These two FIXED color schemes were obviously supported, when necessary, by many “improvised” camouflages, made with indefinable colors available at the time, in relation to the various fronts.”
The decal sheet includes: various data plates, stencils, Harley Davidson logos and serial numbers. The white lettering on the decal sheet disappears against it’s white background, no matter how I adjusted my camera. However, believe me folks….it’s on there.
Division marks are given for: the 5th American Army, the 1st American Army, an unnamed American anti-tank unit, the 34th American Army, the 101st Airborne Division and the 82nd Airborne Division and a Greek bike.
There are the personal nicknames “Buzz Buggy” and “Lana Turner” included too.
What is missing is the “Military Police” lettering that is shown in the box art illustration and on the top of page one of the instructions.
Page 12 has a 5-view line drawing showing where to place the various markings.
The parts trees are not alphabetized, nor do they have part numbers molded next to the parts. This means you will have to constantly refer to the parts tree illustrations in the instructions. Bad move Esci. This will make for very tedious work. A lot of care will be needed here to get things right. However, the trees are numbered sequentially on the parts tree drawings which may help some. The part numbers at least don’t jump around between trees.
The first tree, numbered one – 31 on the parts tree drawings, holds: the frame, fuel tank, fenders, front fork, headlight housing etc. (36 parts)
The Harley Davidson WLA-45 was basically designed from a well-known civilian model. This Harley Davidson was specially manufactured for the U.S. Army in the WLA series (several thousand were built). This model was widely used by the Americans and the Allies during the Second World War. It can be considered one of the most typical American motorcycles of that period, both because of its design and its technical characteristics.
ESCI was a model company based in Italy. They went out of business, but for a time some of their model subjects were sold under the Ertl label. Ertl is based in Dyresville, Iowa. Ertl was sold and the new owners do not make plastic model kits anymore and the company has changed hands several times.
THE KIT:
The kit came in a tray and lid type box. The box art shows a olive green Harley in the markings of the U.S. Army military police with the serial no. 49111 on the sides of the fuel tank. This color illustration spans only one half of the box lid.
Kit features are a completely detailed engine, frame and steering, molded in color, authentic solid vinyl tires and detailed down to separate nuts and washers in places. It has a working front suspension with metal coil springs, a flexible drive chain, vinyl tubing for brake and clutch lines, a clear plastic display name plaque. It includes handle bar grips, straps, windshield, saddle bags, and a Thompson machine gun with carrying case. There are license plates for U.S. Army, Greek Army and 82 Airborne Division.
Inside the box are three large olive drab colored parts trees packed in a cello bag.
A second cello holds a large silver colored parts tree, a medium sized black vinyl parts tree, and a tree of clear parts.
Two hard vinyl tires are loose in the kit. These have great tread detail and raised lettering saying “Firestone” on them.
There is a small cello with wire sleeving and metal springs in it.
The decal sheet and instructions complete the kit’s contents.
I am going to dispense with my usual habit of naming parts on the trees. There are just too many parts and I’d be sure to miss-name some. So, please just look at the photos to see what’s there this time.
The instructions consist of a stapled booklet, eight ½” x 11” format of 12 pages length.
Page one of the instructions begins with a black and white illustration of a Harley Davidson in the markings of the U.S. 1st Army, followed by a history of the motorcycle in English and French.
Page two begins with some general assembly instructions, followed by “special modeling tips”.
Pages three and four have the parts tree drawings and assembly symbol explanations. Also a description of the sequence of assembling steps in English and French.
Pages five through 10 have numerous exploded assembly drawings, but these steps are not numbered and on pages six and seven are really jumbled together. A lot of care is going to be needed to get things assemble right and this kit is definitely NOT for the novice modeler. The assembly drawings are literal SPIDER-WEBS and hard to determine where things go together. Esci should have made more assembly step illustrations that are not so busy. I shudder to think of trying to get this together right.
Page 11 shows the markings on the decal sheet and lists what they represent. However, this listing in the French language describes all 22 marks, but the English language listing below it only goes to 17. So, you will have to wind up translating the French listing of the five that are missing off the English list. Bad move ESCI.
Below this, the instructions say that:
“The camouflage was a dull dirty green and the typical coloration used by the American Armed Forces. When used in desert areas it was in a fairly common light sandy color. These two FIXED color schemes were obviously supported, when necessary, by many “improvised” camouflages, made with indefinable colors available at the time, in relation to the various fronts.”
The decal sheet includes: various data plates, stencils, Harley Davidson logos and serial numbers. The white lettering on the decal sheet disappears against it’s white background, no matter how I adjusted my camera. However, believe me folks….it’s on there.
Division marks are given for: the 5th American Army, the 1st American Army, an unnamed American anti-tank unit, the 34th American Army, the 101st Airborne Division and the 82nd Airborne Division and a Greek bike.
There are the personal nicknames “Buzz Buggy” and “Lana Turner” included too.
What is missing is the “Military Police” lettering that is shown in the box art illustration and on the top of page one of the instructions.
Page 12 has a 5-view line drawing showing where to place the various markings.
The parts trees are not alphabetized, nor do they have part numbers molded next to the parts. This means you will have to constantly refer to the parts tree illustrations in the instructions. Bad move Esci. This will make for very tedious work. A lot of care will be needed here to get things right. However, the trees are numbered sequentially on the parts tree drawings which may help some. The part numbers at least don’t jump around between trees.
The first tree, numbered one – 31 on the parts tree drawings, holds: the frame, fuel tank, fenders, front fork, headlight housing etc. (36 parts)

The second tree, numbered 32 – 83 is molded in silver and holds the engine and exhaust parts, the Thompson machine gun case etc. (58 parts)
The third tree, numbered 84-151, holds: the handle bars, more frame parts, control levers, Thompson machine gun and many other parts too numerous to name (70 parts)
The fourth tree, numbered 152 – 194, holds: wheel rims, saddle bags, various linkages etc. (54 parts)
The next tree is the black vinyl parts, numbered 195 – 202. You get the seat cushion, the drive-chain, some straps, a windshield apron etc. (14 parts)
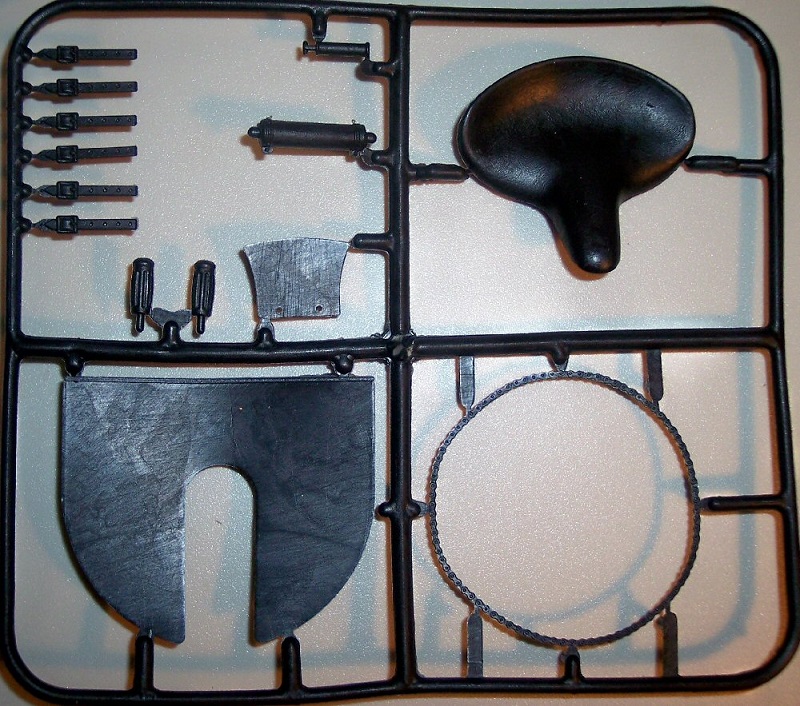
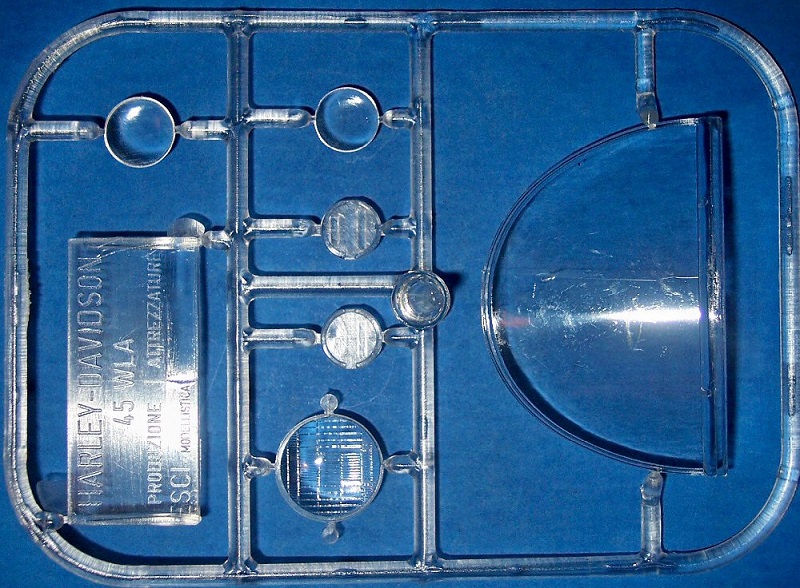
The last tree of parts, numbered 203- 208 is the clear parts for the windshield, headlight and tail-light lenses and the name plaque (7 parts)
The metal springs, wire sleeving and decal sheet complete the parts contents. The springs are used inside the front fork to make it compress and expand and the sleeving is to do the brake and clutch lines on the motorcycle.

The vinyl tires.
This is a very complex model. Not recommended for the beginning modeler. Much care will have to be taken, as already mentioned above, when assembling it…because of the confusing instructions and lack of part numbers on the parts trees. Dry fitting and testing the fit of things are in order here. Not a weekend project by any means.
Modelers with weak eyes, like me, will really not love this kit.
I purchased my kit years ago at the Ertl factory discount store.
Modelers with weak eyes, like me, will really not love this kit.
I purchased my kit years ago at the Ertl factory discount store.
